Basic Sandwich Bread

For many years, one of the goals on my recipe checklist has been to find a recipe for a perfect loaf of sandwich bread. I envisioned the bread as an alternative to the many loaves I have purchased from the store over the years, working equally well with a spread of jam as it would as the backbone of a good sandwich. I wanted the recipe to be simple, the bread to be soft, and the crust to be golden and chewy. The task seemed easy enough, but as time has proven again and again, the kitchen staples are the most difficult to get just right. 

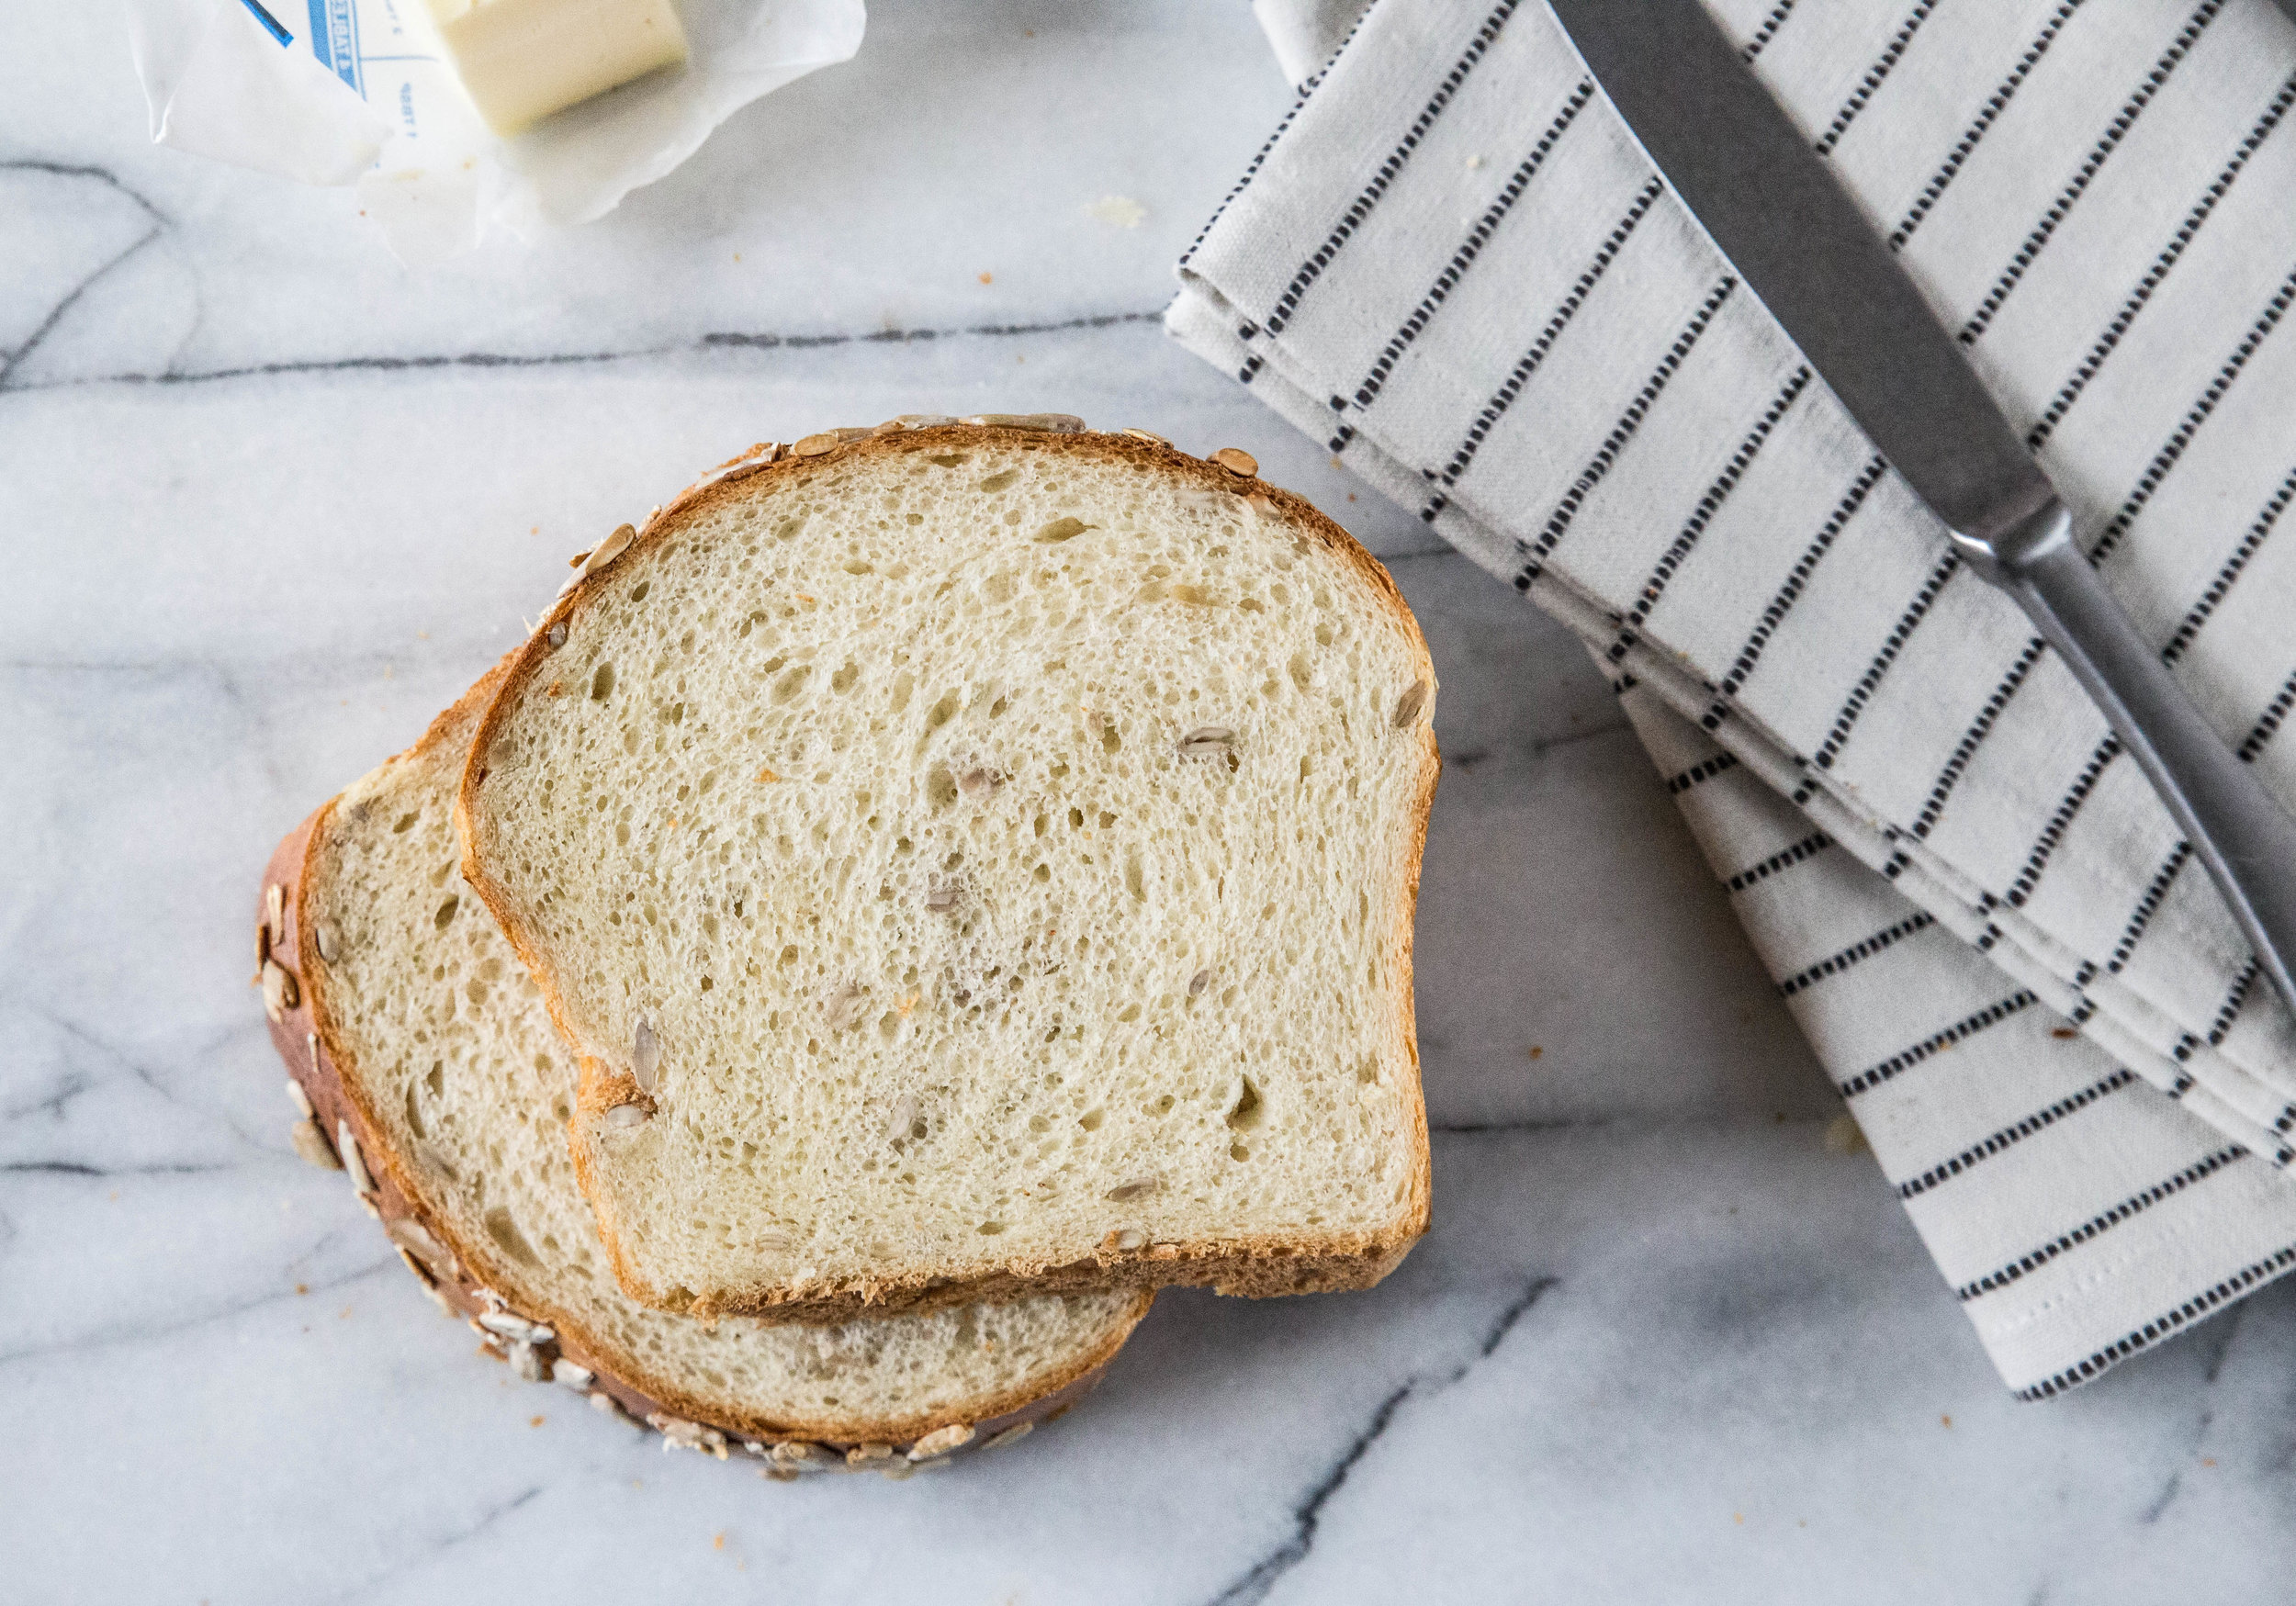
I have worked on this task passively since I began developing my own recipes years ago. There were many good loaves along the way, but never a loaf that made me stop in my tracks and proclaim, "This is the one!" Well, that is, until now. This basic sandwich loaf meets all of my requirements. The recipe is simple, only requiring 20 minutes or so of active preparation. The interior is light and soft, with sunflower seeds added for variation in taste and texture. The exterior is brushed with an egg wash to brown the loaf and give the golden crust a chewy texture. The egg wash also helps seeds or oats stick to the top so it can be adorned however you please. 

I haven't played around yet with substitutions (such as multi-grain or whole wheat), but when I find another recipe I will certainly share. I've had more than my fair share of bread over the years, but this loaf truly stands out as something special. 

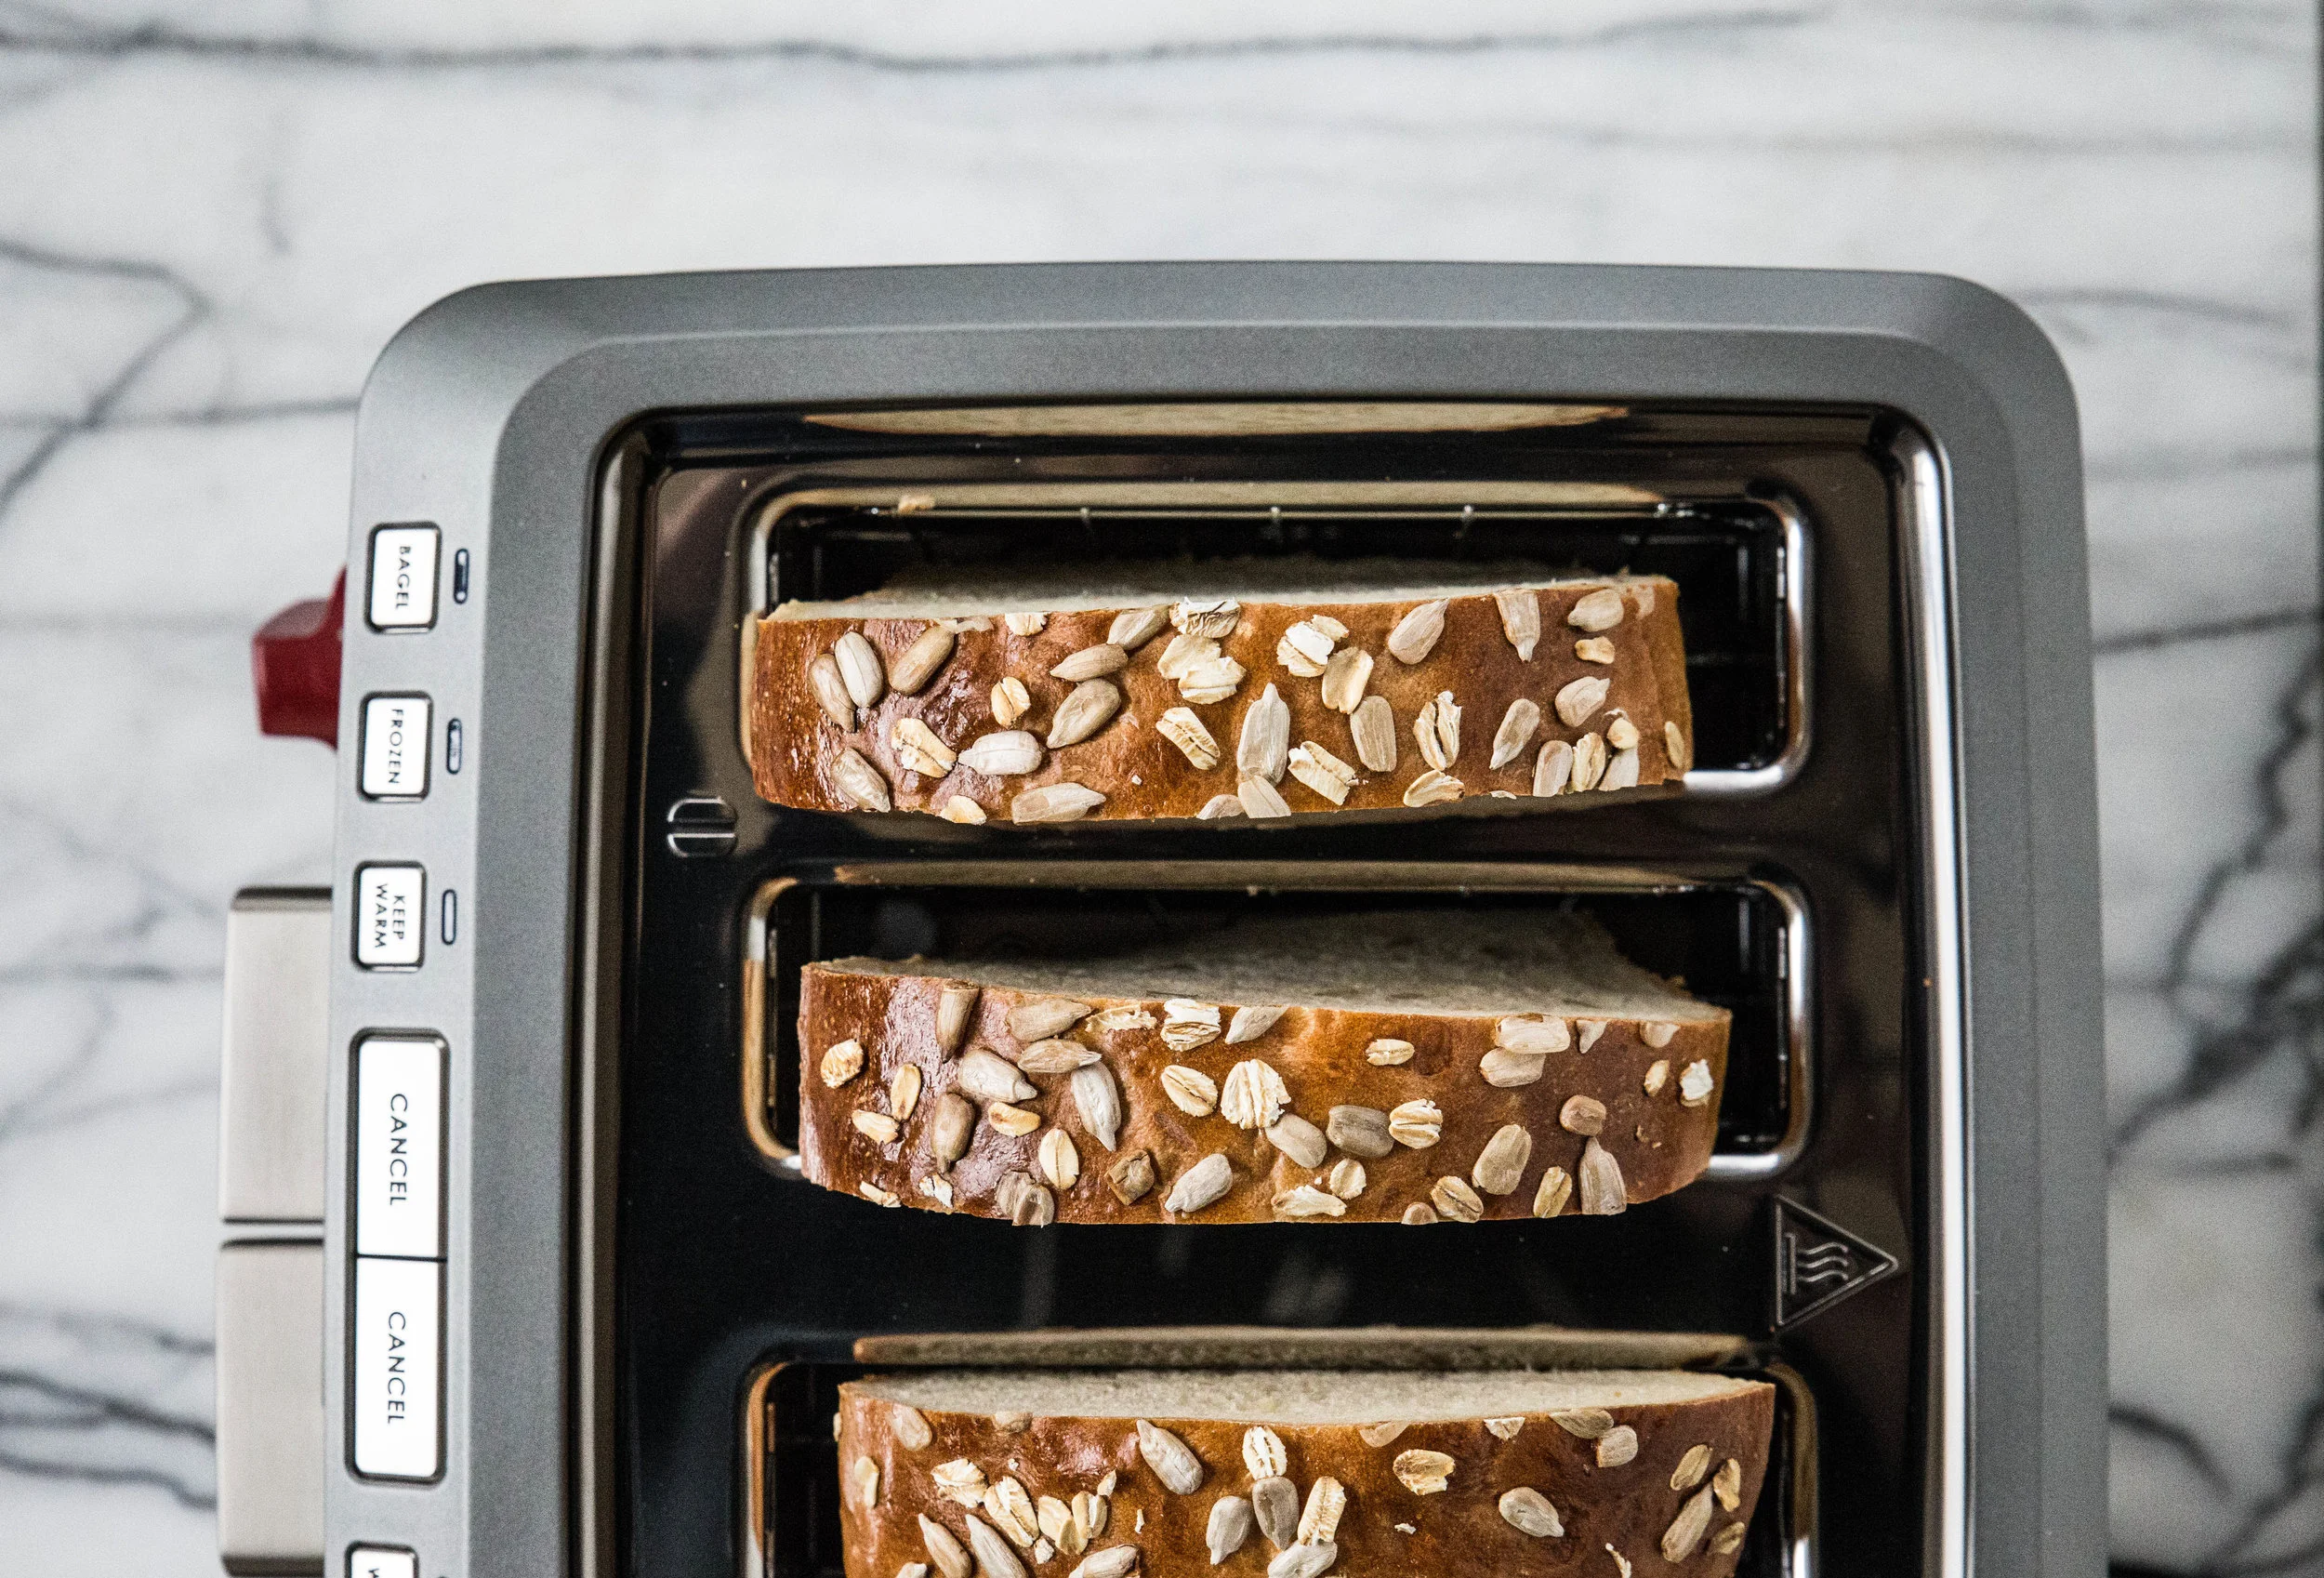
My boyfriend starts every morning with two slices of peanut butter toast. Over the last five years, we have gone through several toasters together. The first, a relatively cheap toaster, lasted for a couple years before the coils burnt out. The second, a much more expensive toaster, brought hopes that it would hold up over time. It did hold up, but it performed dreadfully at its single purpose. With a shade scale from 1 to 5, it blackened toast at level 2 and set off the smoke detectors at level 3. My boyfriend actually taped down the shade scale knob because the toaster never seemed to toast consistently at the same level, believing I must have been messing with it (I wasn't).

When Wolf Gourmet asked me to test their Four Slice Toaster, I was excited to see how it would perform against my past experience. The toaster fits larger than average slices and self-centers the bread while toasting to ensure even browning. It works equally well with store bought sandwich loaves as it does with artisan breads. The toaster also has special settings for frozen bread or waffles so they defrost and toast to your desired level in one easy step. 

My favorite feature on the toaster is the "Keep Warm" button, which toasts the bread and keeps it warm for up to three minutes thereafter. When I am rushing around the kitchen preparing other ingredients, it is a definite perk to have the toast ready whenever I am (especially when spreading butter or peanut butter to the ideal melting consistency). Albeit minor, my only complaint is that it may take more than one cycle to reach a dark toasted brown when toasting extra thick slices of bread. Overall, the toaster reached my expectations in its single purpose—making a perfect piece of toast.

IMG_8820-2.jpg

Edit: Giveaway closed.

This Basic Sandwich Loaf is a kitchen staple. The bread is subtly sweetened with honey and uses olive oil to retain a soft crumb. Sliced thin for sandwiches or thick for toast, the bread holds up well in variety of situations. I prefer mixing in a few raw sunflower seeds for flavor and texture, but you could do as you choose with your loaves. For best results, use a new package or container of active dry yeast.

One Year Ago: Hazelnut Cherry Granola with Chocolate Coconut Bites
Two Years Ago: Cherry Almond Granola and Cinnamon Sugar Swirl Loaf
Three Years Ago: Honey Almond Quinoa Granola & Coconut Tapioca Pudding
Four Years Ago:  Raspberry Lemon Cupcakes, Pita Bread, Almond Joy Candy Bars, & Mango Lassi
Five Years Ago: Blackberry Goat Cheese Tart, Chocolate Whoopie Pies, Hot Cross Buns, & Irene's Orange Rolls
Six Years Ago: Honey Rolls, Chocolate Nests, & Roasted Pineapple

Basic Sandwich Bread

Yields 1 loaf

Dough
2 teaspoons active dry yeast
1 cup (235 ml) barely warm milk
1/3 cup (80 ml) barely warm water
2 tablespoons honey
2 tablespoons olive oil
1 teaspoon salt
3 1/2 cups (445 grams) bread flour
1/4 cup (33 grams) raw sunflower seeds (optional)

Topping
Egg wash (1 large egg + 1 tablespoon water, whisked)
Raw sunflower seeds (optional)
Old fashioned oats (optional)

In a large mixing bowl (or bowl of a stand mixer), sprinkle the yeast over the barely warm milk and water. Stir in the honey, olive oil, and salt. Gradually add bread flour and sunflower seeds, mixing until the dough comes together. If the dough is too dry and will not come together, add small amounts of water until it does. Conversely, if the dough is too sticky, add flour until it becomes workable; however, do not add too much flour or the bread will become dense.

Turn out dough onto a lightly floured surface and knead the dough for 7-10 minutes, or until elastic. Alternatively, using the dough hook on a stand mixer, knead the dough for 7-10 minutes, or until elastic. Cover dough with plastic wrap or a kitchen towel and let rise until doubled in a warm place, about 1 to 1 1/2 hours. Punch down the dough before turning out onto a lightly floured surface. Shape the dough into an even log and place in a lightly greased 9 x 5-inch loaf pan. Press dough down so it reaches the corners evenly. Cover with a kitchen towel and let rise for another 40-50 minutes until doubled.

Preheat oven to 350 degrees F (180 degrees C).

Brush the top of the loaf with egg wash. Sprinkle with sunflower seeds and oats, if desired. Bake for 40-50 minutes, or until bread is golden and sounds hollow when tapped (internal temperature of 190 degrees F). Remove from baking pan and allow to cool before slicing and serving.

Disclosure: A complimentary four slice toaster was provided for review by Wolf Gourmet. As always, all thoughts and opinions are my own.

Blueberry Banana Baked Oatmeal

Spring is a time of transition. The long daylight hours and warmth of the sun bring promise of summer, but the chill of the mornings are still reminiscent of winter. The bare branches are beginning, ever so slowly, to gain color. In my personal life, it is also a time of transition. After an exhausting search for a house involving multiple offers and multiple disappointments, an offer was accepted on my dream house. I am still nervous, fearful that somehow even now it will all be too good to be true. There are still compromises, as I knew there would be (mainly being in proximity to a busy, noisy road), but the rest is more beautiful than I dared to imagine.

As the reality of a huge purchase is settling in, I am trying to shake off the anxious energy building within me. The closing date is two months away, so I'm spending my time designing the new space instead of worrying about the decision. The move from an apartment to a home will be an enormous shift in a dozen different ways, but I couldn't be more excited about the change.

Over the last couple months, the overwhelming stress of the house search made it difficult to take proper care of everything else. Dishes sat on the counter, clothes piled up on the floor, and other responsibilities were set aside as all free time was devoted to looking at houses. Making meals in large quantities was one choice that helped ease the stress. One of the best breakfast decisions was making a large batch of baked oatmeal on the weekends.

During the spring months, when the weather is still unpredictable, I find that a big bowl of hot cereal satisfies the hunger as well as the soul. Oatmeal has a warmth and heartiness that starts a day off right. With this baked version, I used frozen blueberries for convenience. The oatmeal comes together quickly and leftovers can be easily reheated to enjoy during the rest of the week.

Blueberry Banana Baked Oatmeal is a hearty breakfast that is enjoyed hot from the oven. Cinnamon spiced oats are layered with sliced bananas, toasted almonds, and blueberries. The oats are lightly sweetened with maple syrup; additional syrup can be added to each serving to find the ideal level of sweetness. The baked oatmeal reheats well, which makes it ideal for a quick breakfast on weekday mornings.

One Year Ago: Bananas Foster Sauce 
Two Years Ago: Banana Chocolate Hazelnut Cupcakes 
Three Years Ago: Orange Coconut Pull-Apart Bread & Coconut Macaroons
Four Years Ago:  Chocolate Oatmeal Raisin Cookies, Coconut Whipped Cream, Chocolate Ginger Biscotti, & Banana Cinnamon Pancakes
Five Years Ago: Chocolate Caramel Crispy Bars, Tropical Banana Bread, Strawberry Balsamic Jam, & Strawberry Honey Oatmeal Bars
Six Years Ago: Banana Pudding, Devil's Food Cake, Flourless PB Cookies, & Orange Scones

Blueberry Banana Baked Oatmeal
Adapted from Heidi Swanson's Super Natural Every Day

Yields 4-6 servings

2 cups (160 grams) old fashioned oats
1/2 cup (70 grams) almonds, toasted and chopped
1 teaspoon baking powder
2 teaspoons ground cinnamon
1/2 teaspoon salt
2 cups (500 mL) whole milk (I used almond milk)
1/4 cup (65 mL) pure maple syrup
1 large egg
1 1/2 tablespoons olive oil
2 teaspoons vanilla extract
2 ripe bananas, sliced into 1/2-inch pieces
1 to 1 1/2 cups (175-225 grams) fresh or frozen blueberries

Preheat oven to 375 degrees F (190 degrees C). Grease an 8 x 8-inch square baking pan.

In a medium bowl, stir together the oats, half of the almonds, baking powder, cinnamon, and salt. Set aside.

In another bowl, whisk together the milk, maple syrup, egg, olive oil, and vanilla extract. Set aside.

In the prepared pan, place banana slices in a single layer. Sprinkle on 2/3 of the blueberries and cover with the oat mixture. Pour milk mixture over the oats. Sprinkle the remaining 1/3 blueberries and remaining almonds.

Bake for 35-45 minutes, or until golden brown and oats are set. Serve with a splash of milk and a drizzle of maple syrup for extra sweetness, if desired.  

    Oatmeal Fudge Bars

    I have held an affinity for houses since I was young. Growing up, I had recurring dreams of houses filled with endless rooms. I would explore them, opening door after door, impatient to see what the next one held, disappointed when I finally awoke. Nowadays, my love for houses reveals itself in less subtle manners. Along with a standing date to watch This Old House on Sunday mornings, I regularly go on home tours for no reason other than a curiosity to know what's inside. In the summer, my boyfriend and I go on long walks around the lakes scattering our Minnesotan city. The lake walks are our compromise; he prefers to take in the beauty of nature and I prefer to take in the beauty of the lakefront properties. 

    I imagine the lives held within those four walls—what the mothers hope, what the fathers fear, what the children dream.

    Now that I've recently started the search for a home, the excitement I've kindled has faded somewhat as the reality has sunk in. The market is difficult, the region I'm searching is one of the highest priced in the city, and the houses I can afford will need a lot of love. I understood there would be compromises, but it wasn't until I was actually faced with the tangible decisions that I realized how difficult this process would become. Do I choose the house with the beautiful yard, but disappointingly tiny kitchen? The house with the pleasing fit and finish, but dysfunctional layout? While a good coat of paint can go a long way, it cannot cover up the unchangeable.

    Right now I am looking for a beautiful place, a beautiful place to grow my family, a beautiful place that needs only a good coat of paint and little else. It doesn't exist—not for me and not right now—which has been a hard realization to swallow. Adjusting my expectations has left me with complicated feelings, especially when reality still comes at such a high price.

    A house doesn't make a home, as my mother reminds me. And she's right, of course. It will be up to me to make a place beautiful, to put in the love and the work and the hope, to build a home.

    Oatmeal Fudge Bars are a sweet, chewy bar to satisfy your cookie cravings. The bars feature rich dark chocolate sandwiched between chewy oatmeal cookie layers. The cookie layers are more pronounced than the chocolate, creating a balance between flavors. Enjoy with a tall glass of milk.

    One Year Ago: Quick Puff Pastry & Traditional Challah
    Two Years Ago: Chocolate Orange Cake & Blackberry Coconut Scones
    Three Years Ago: Almond Cake & Peanut Butter Chocolate Cake
    Four Years Ago:  Blueberry Lemon Pancakes, Lavender Lemon Shortbread, Lemon Pudding Cake, & Chocolate Oat Muffins
    Five Years Ago: Rosemary Focaccia, Swedish Visiting Cake, Chocolate Toffee Scones, & Rosemary Crackers
    Six Years Ago: Lemon Chocolate Tart, Coconut Cream Cupcakes, Yeasted Waffles, & Vanilla Almond Cupcakes

    Oatmeal Fudge Bars

    Yields 16 servings

    Oatmeal Bar
    1/2 cup (113 grams) butter
    1 cup (200 grams) brown sugar, packed
    1 large egg
    2 teaspoons vanilla extract
    1 1/2 cups (180 grams) all-purpose flour
    1/2 teaspoon baking soda
    1/4 teaspoon salt
    1 3/4 cups (170 grams) old-fashioned oats

    Chocolate Filling
    5 ounces (140 grams) semisweet chocolate, roughly chopped
    1/3 cup (80 mL) heavy cream or full-fat coconut milk
    1/2 teaspoon espresso powder, optional

    Preheat oven to 350 degrees F (180 degrees C). Line an 8 x 8-inch pan with parchment paper and lightly grease.

    In a medium bowl, beat together butter and brown sugar until light and fluffy. Beat in egg and vanilla until uniform. Gradually add flour, baking soda, salt, and oats, mixing until uniform. Press 2/3 of the dough into the prepared pan evenly. Set aside the remaining 1/3 of dough.

    In a microwaveable safe bowl, combine roughly chopped chocolate, heavy cream, and espresso powder.  Heat in 30-second increments in the microwave, stirring between each increment until smooth. Pour over dough and smooth.

    Crumble remaining 1/3 dough over the top and bake for 25-30 minutes, or until lightly browned. Cool completely before cutting and serving.