Peach Almond Galette

IMG_9634-2.jpg

At the beginning of June, my husband and I sat down and made a '“summer bucket list.” We checked in with our modest list for the first time last night. With August right around the corner, we have crossed off only one of the items.

Time has been getting away from me lately, entire days seemingly disappearing into the void. The daily routine is both a blessing and a curse. It’s wonderful for keeping a 7 month old (and her exclusively pumping mama) on a happy schedule, but it leaves little room for spontaneity.

In many ways, it feels like I’m hitting autopilot and cruising through life without engaging meaningfully.

IMG_9513-2.jpg
IMG_9560-2.jpg

I’ve been thinking recently about how to feel more present in my own life. Breaking the cycle and changing habits may be difficult, but it is starting to feel increasingly more essential. While I cannot change the large building blocks of my day, I can change my behavior in the small moments.

In general, I want to move myself away from the culture of detached consumption and into a space of creation. I need to set down my phone, so I don’t have the option of mentally checking out whenever the day begins to feel tedious. The endless scrolling does not bring me happiness, but it is so difficult to avoid.

Instead, I want to go for more walks with Baby N, cook recipes with seasonal vegetables, and bake a great loaf of sourdough bread with my new starter. I want to read more books and watch less television, spend mornings in the garden, and find ways to get out of the house and go on adventures with N (even if it is just to run a few errands). I want to build time into the day for myself and myself alone.

Wish me luck—change may be hard, but it is easier knowing it will make me a happier, more engaged mother in the end.

IMG_9612-2.jpg

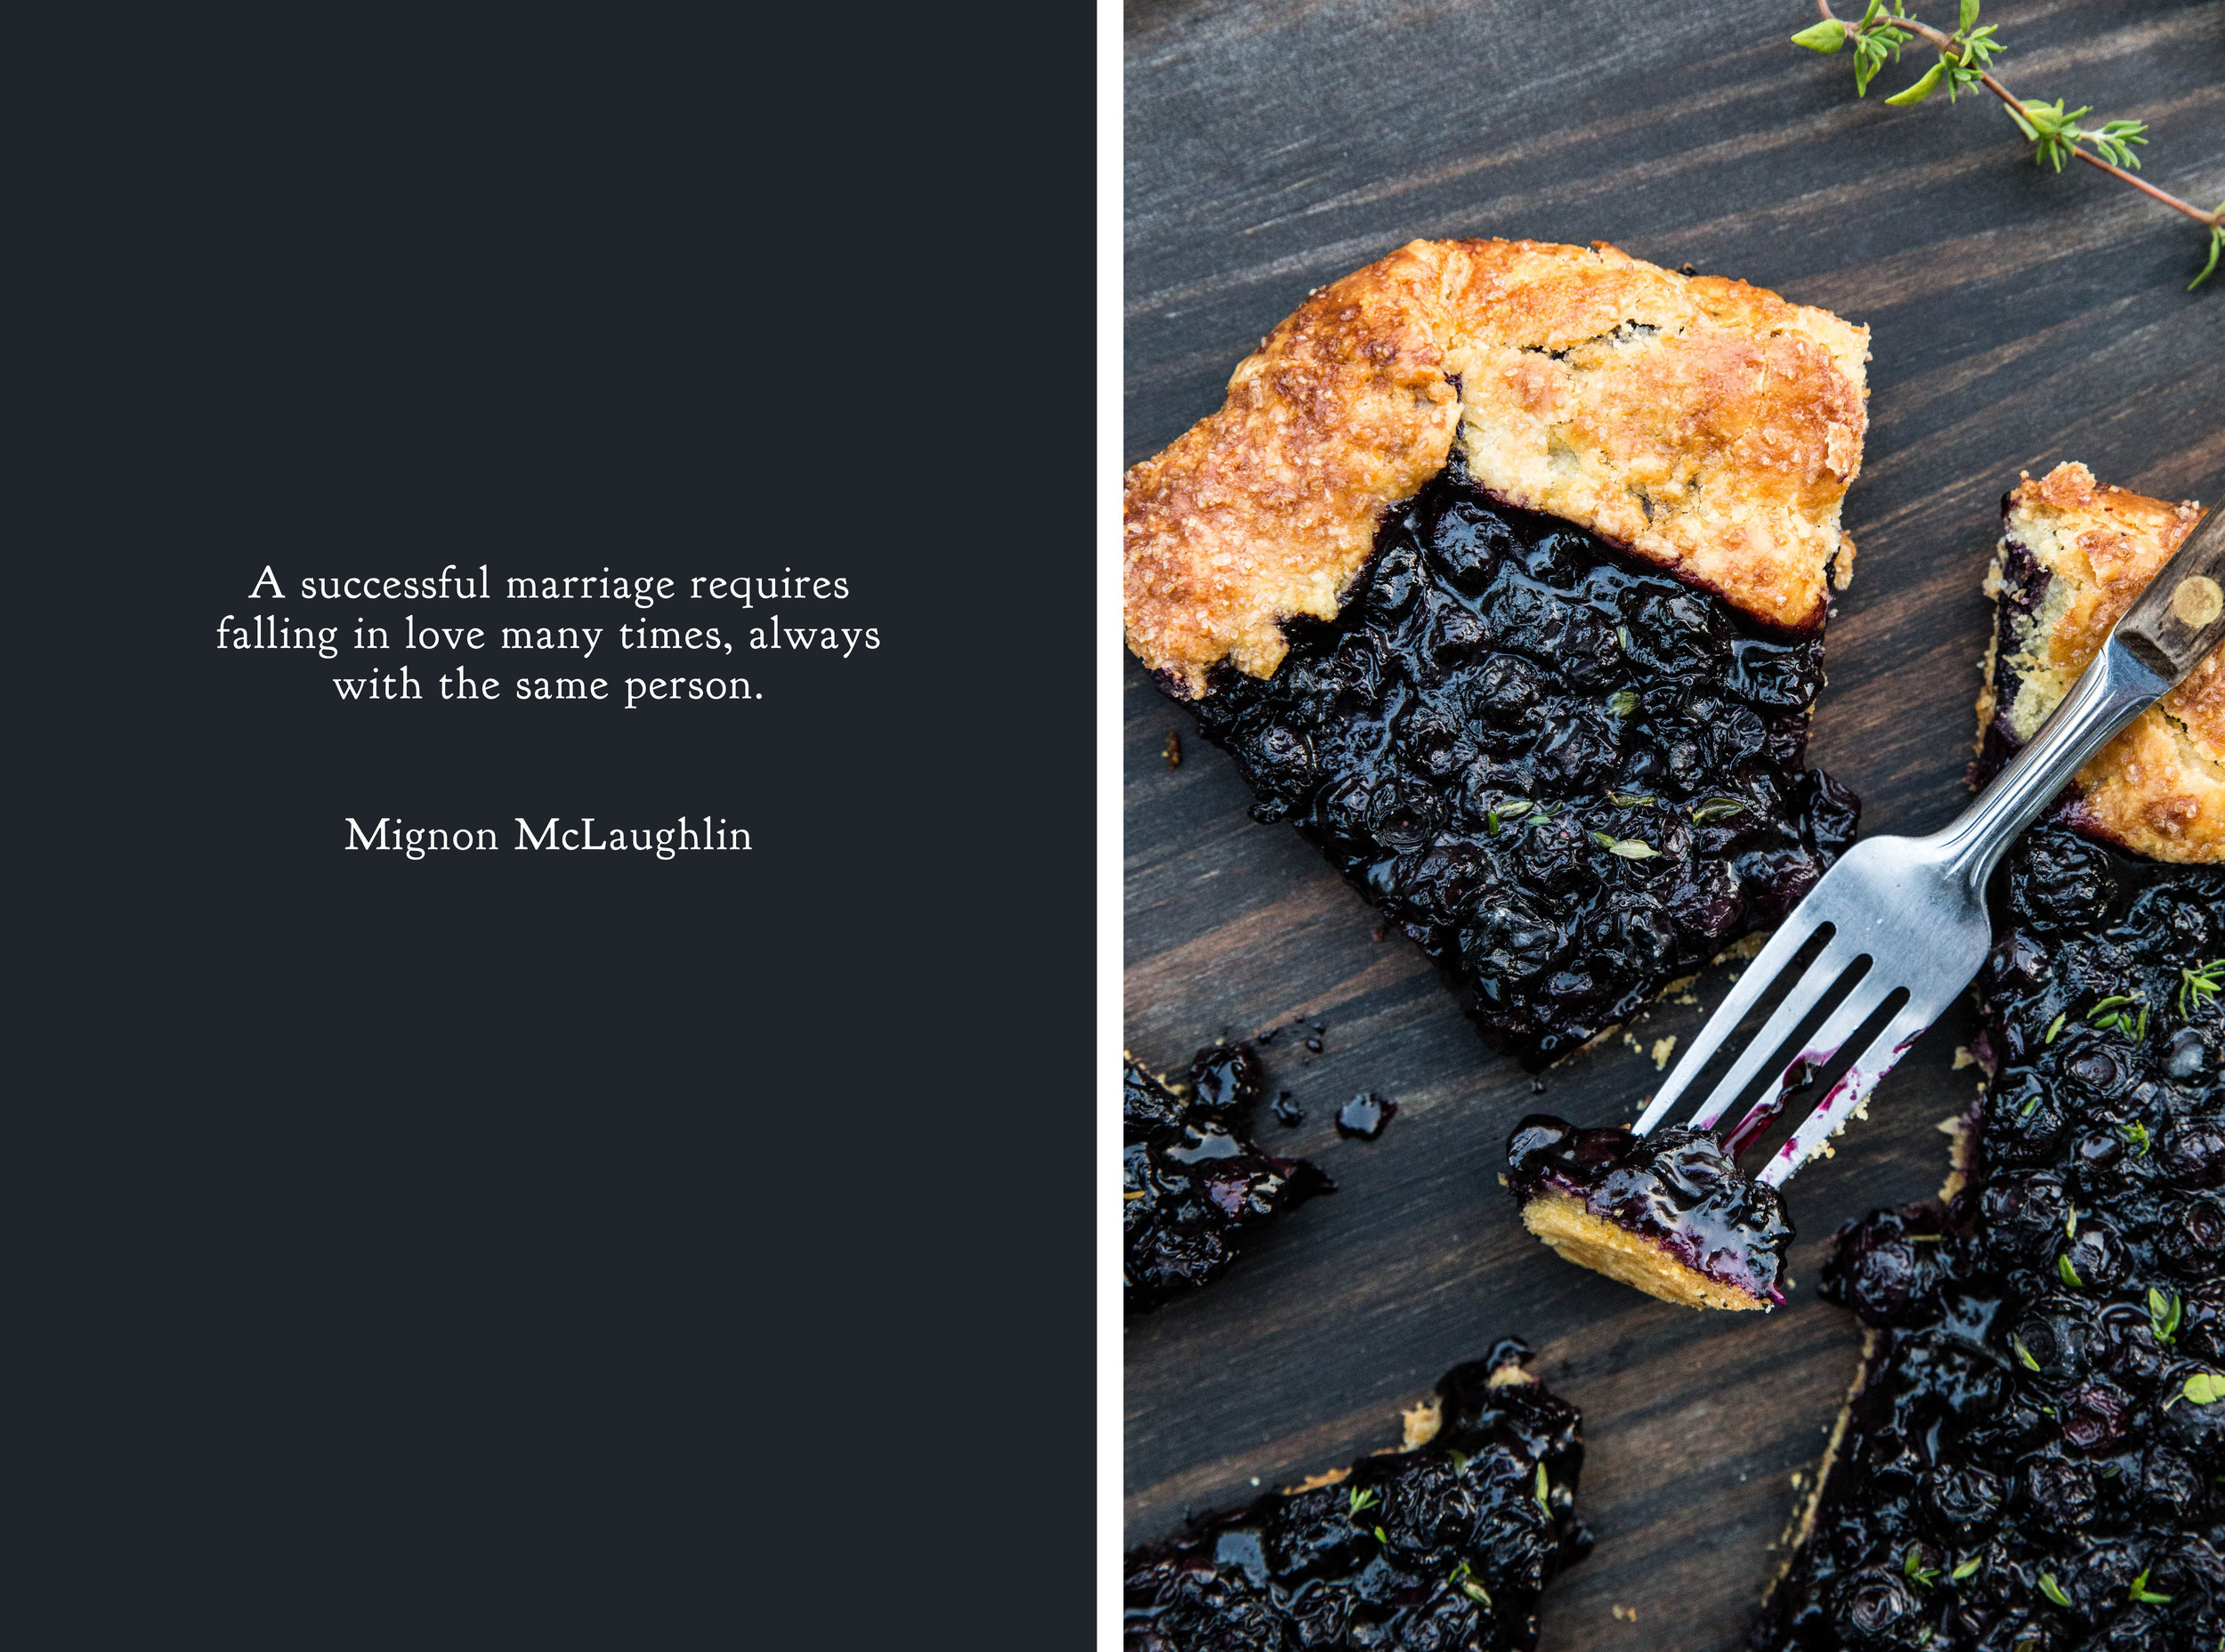
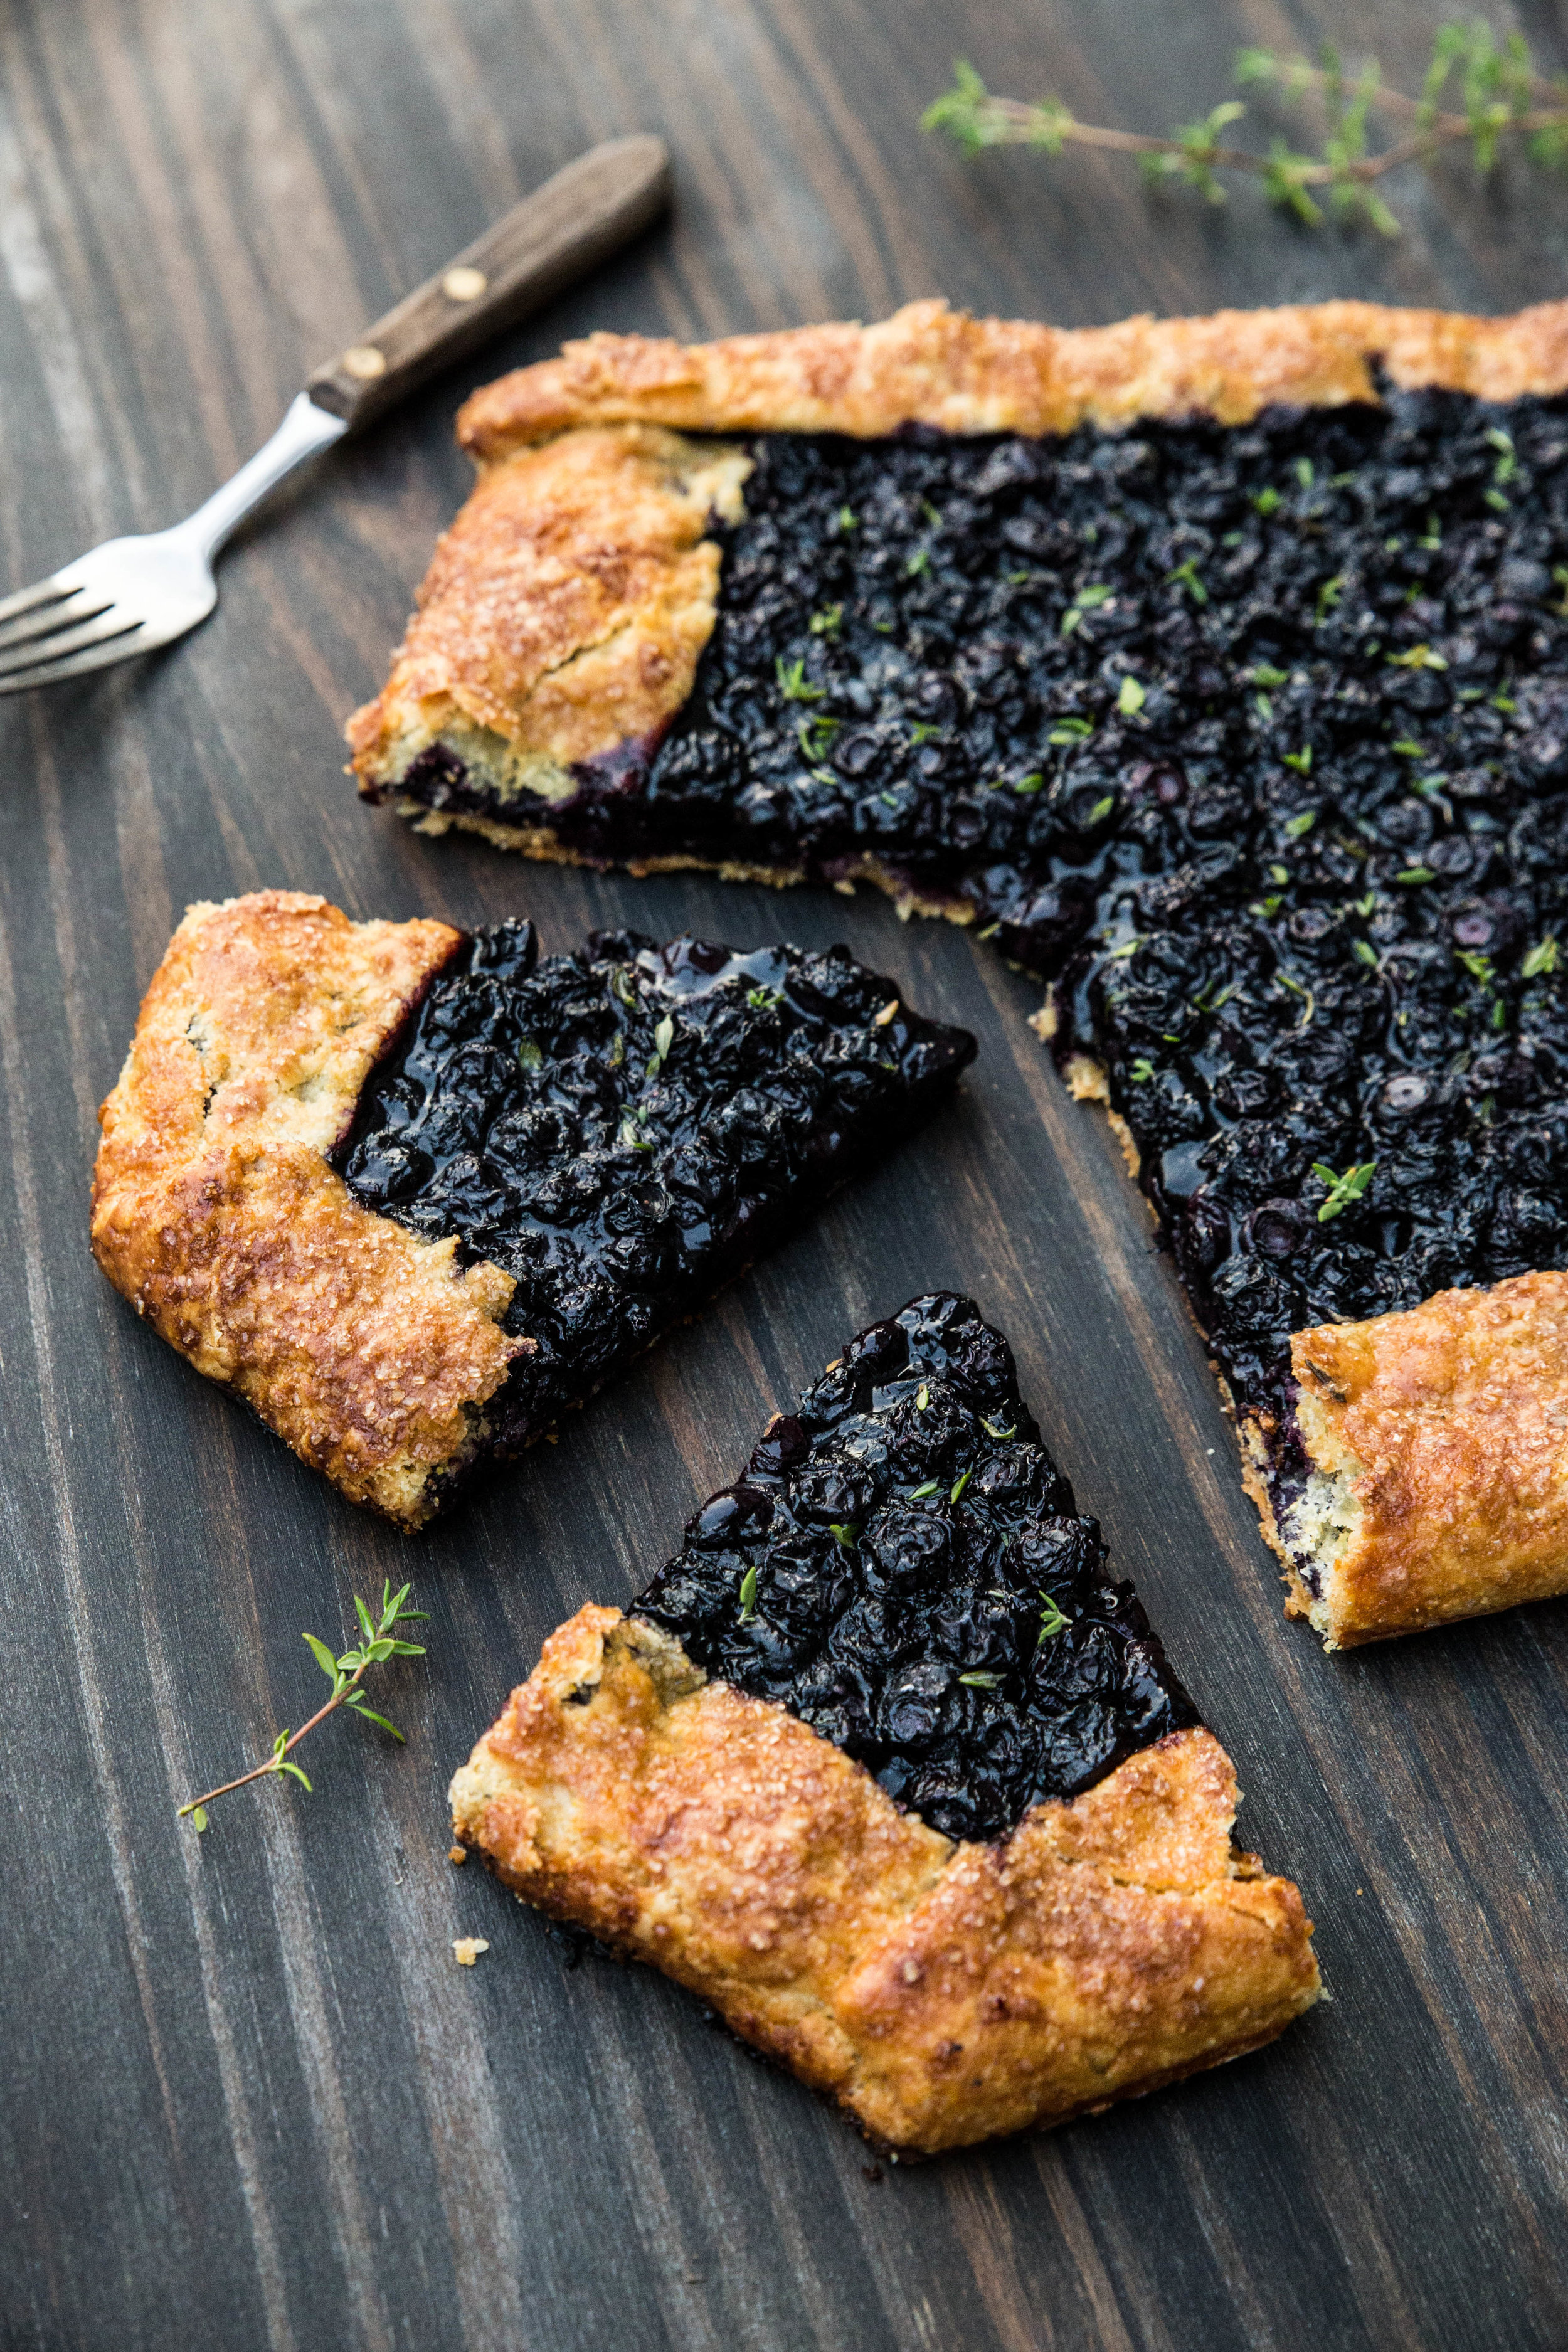
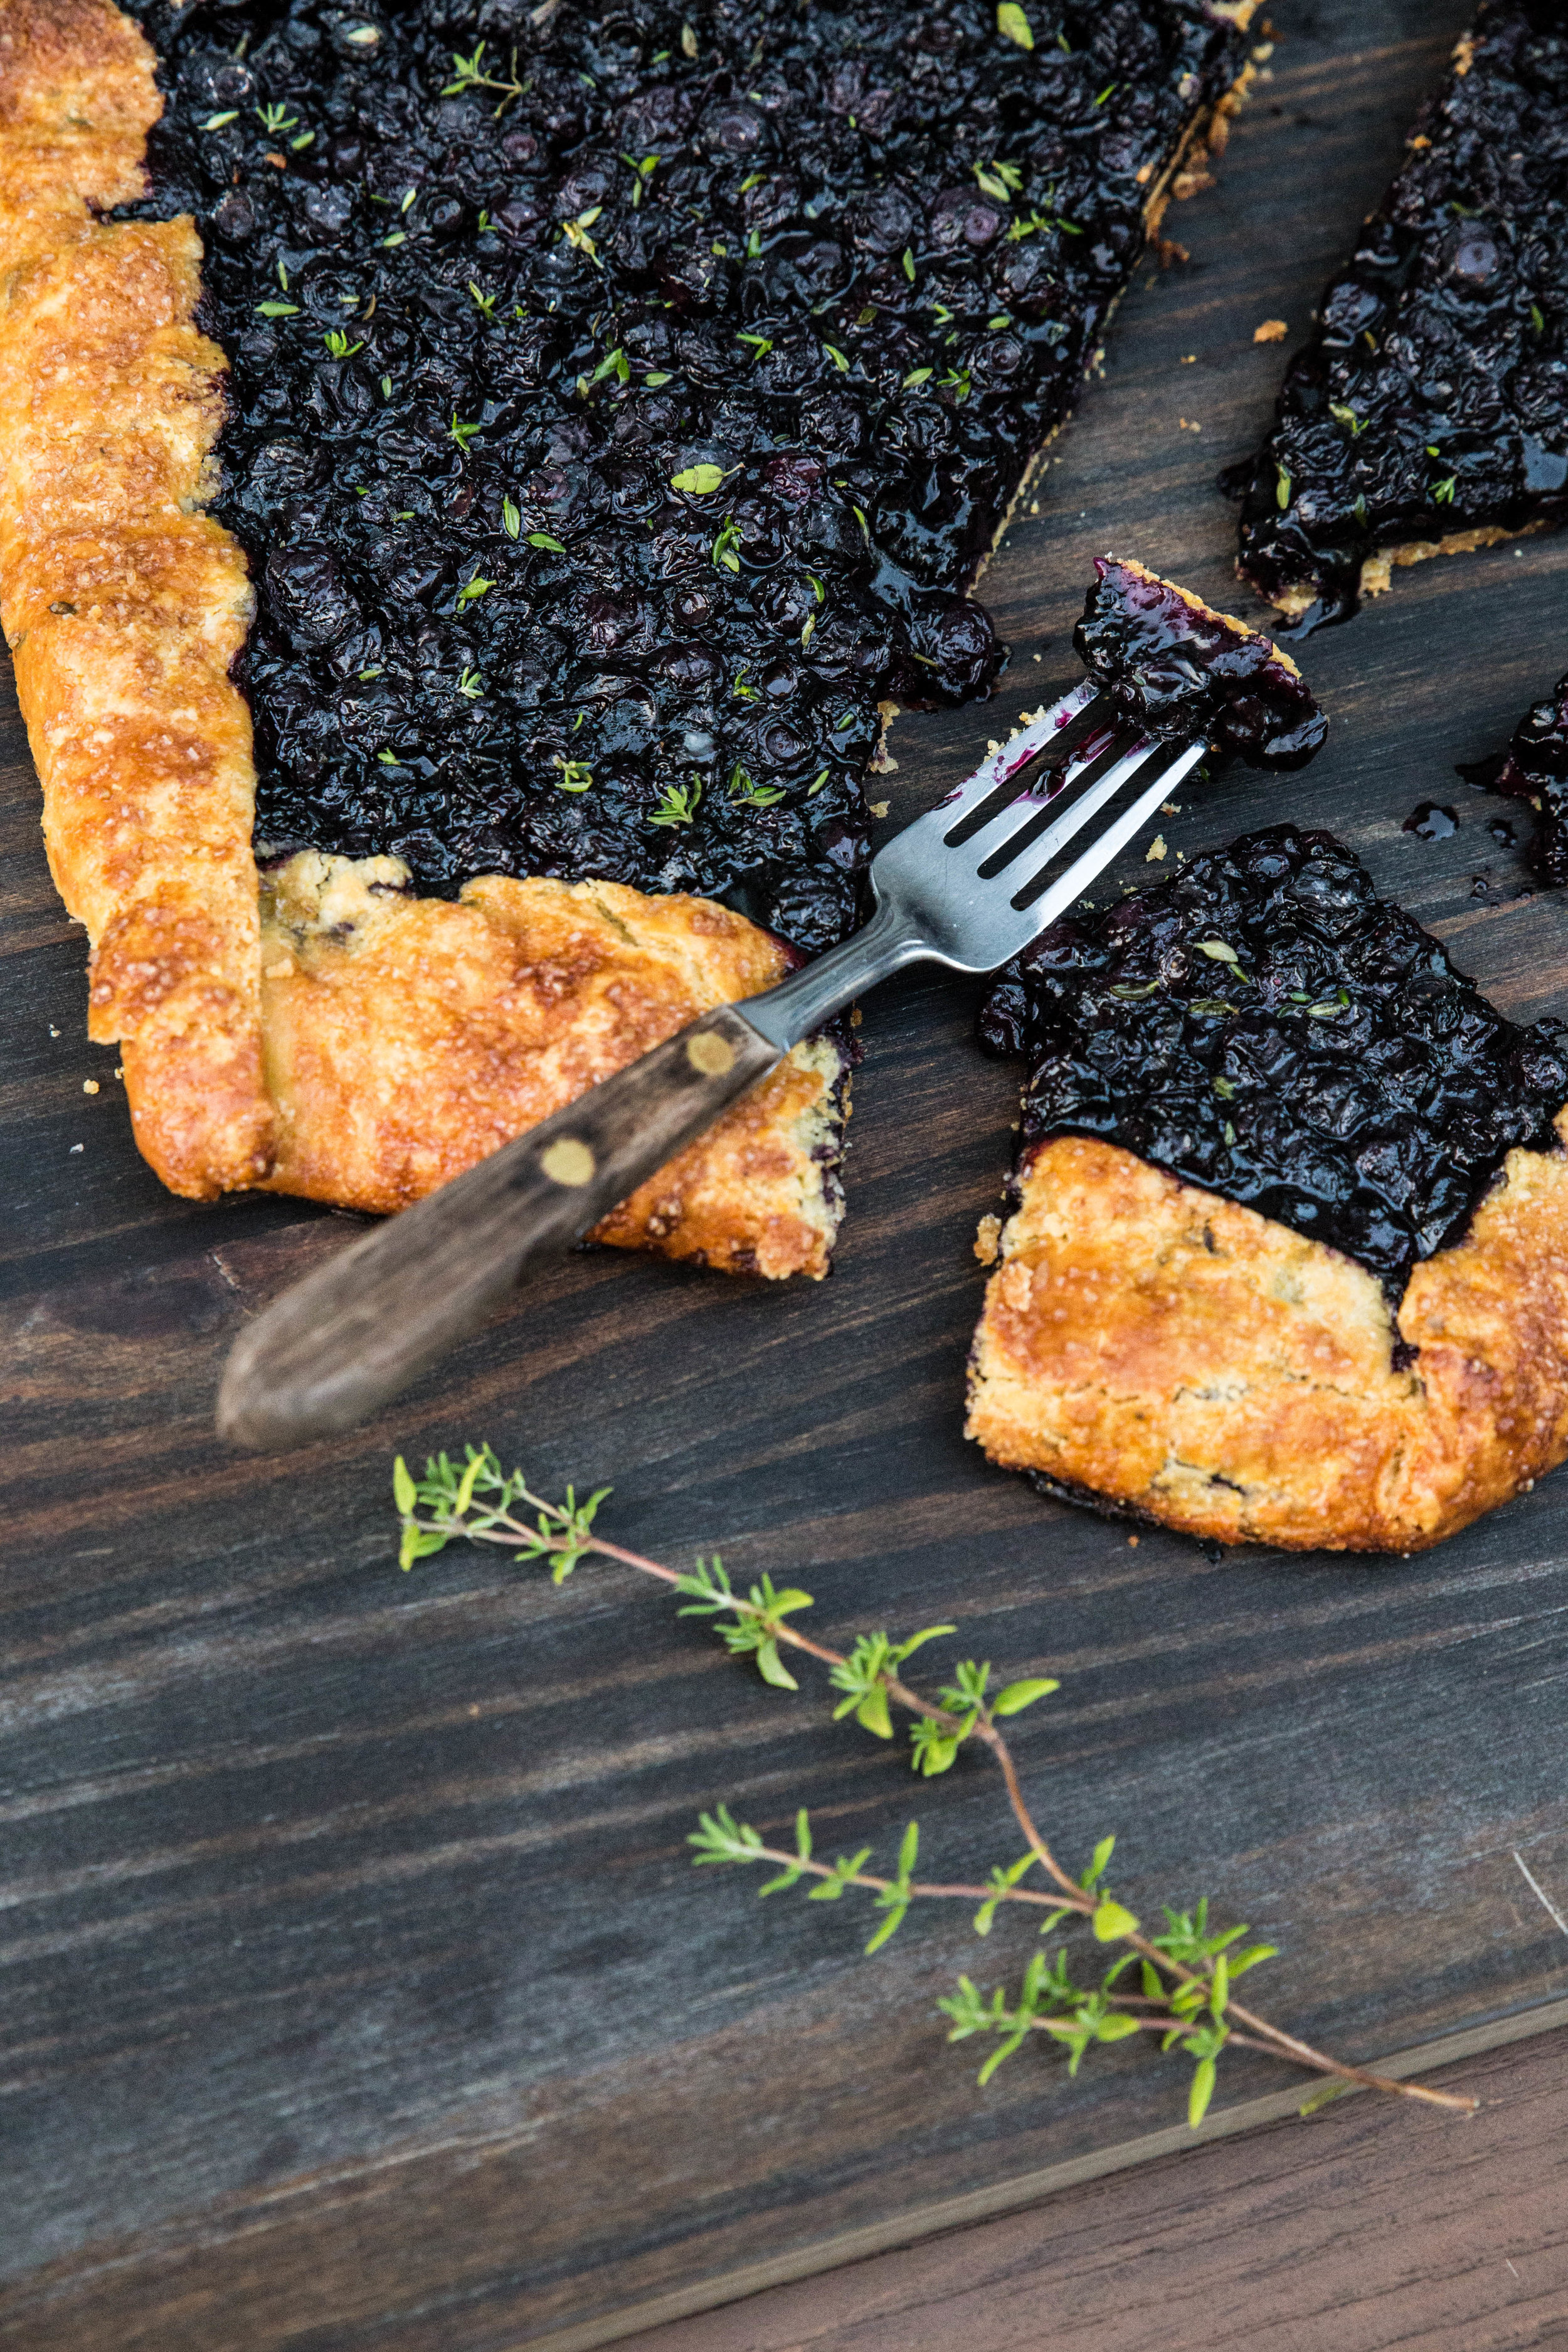
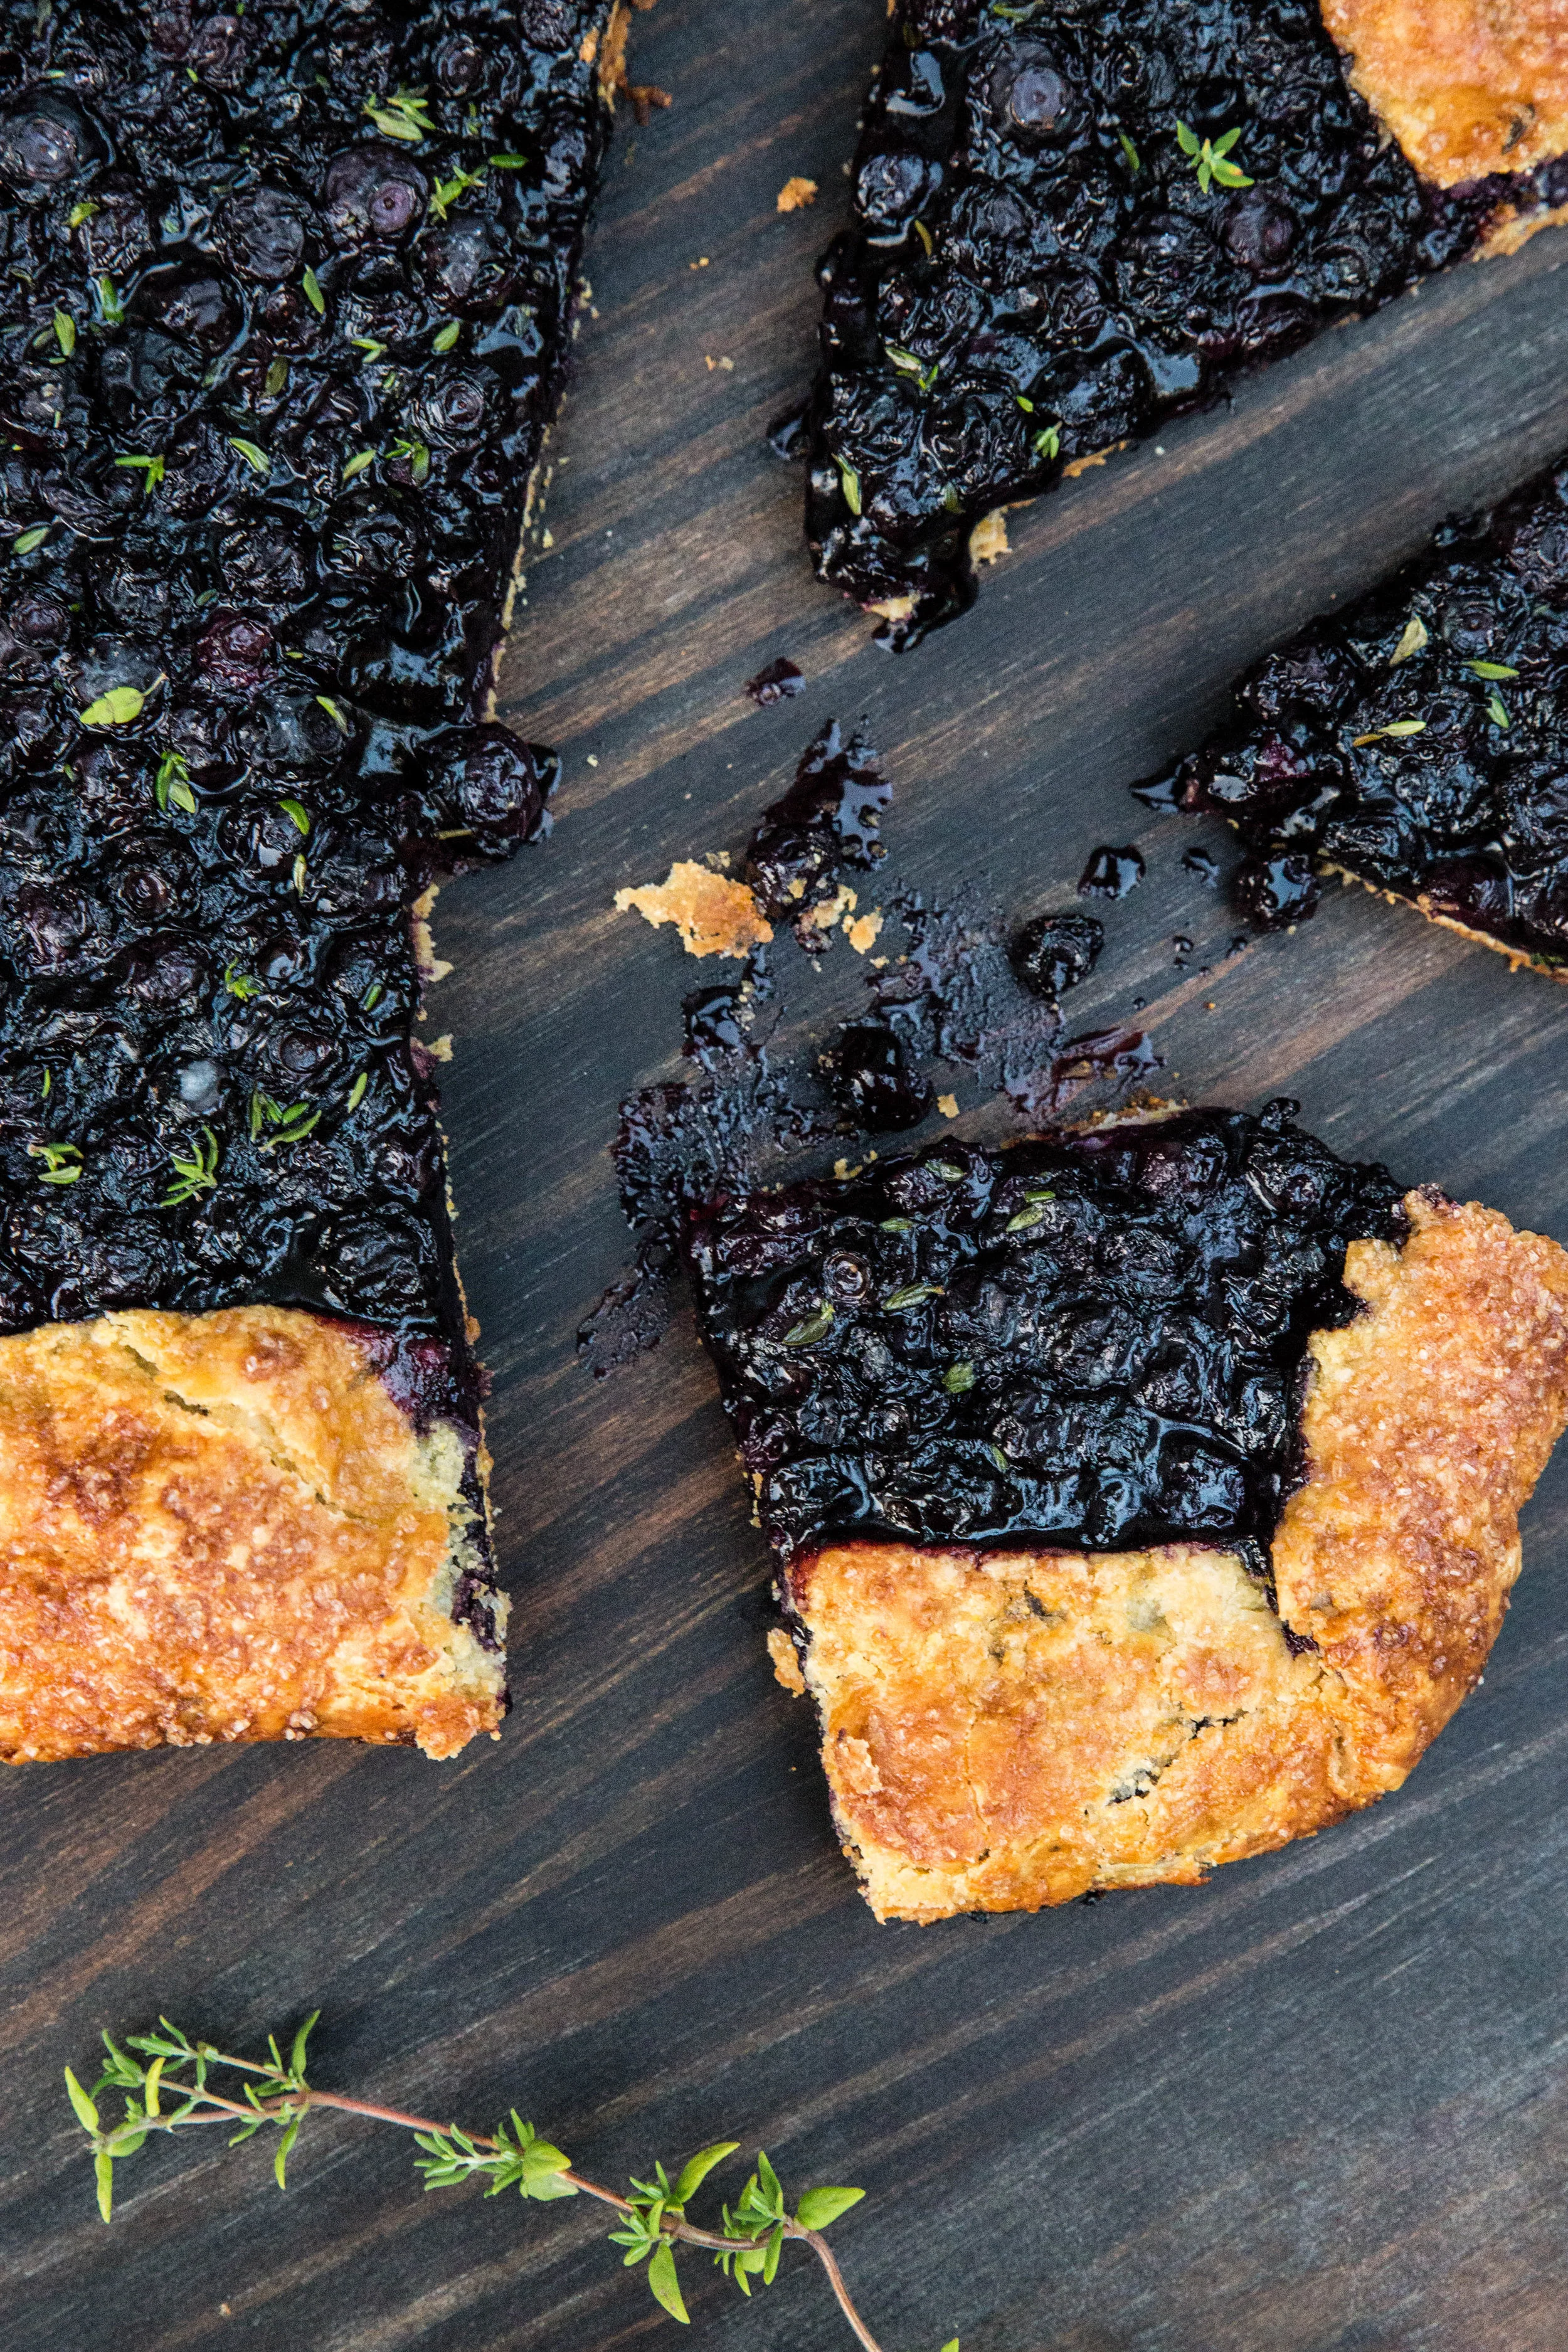
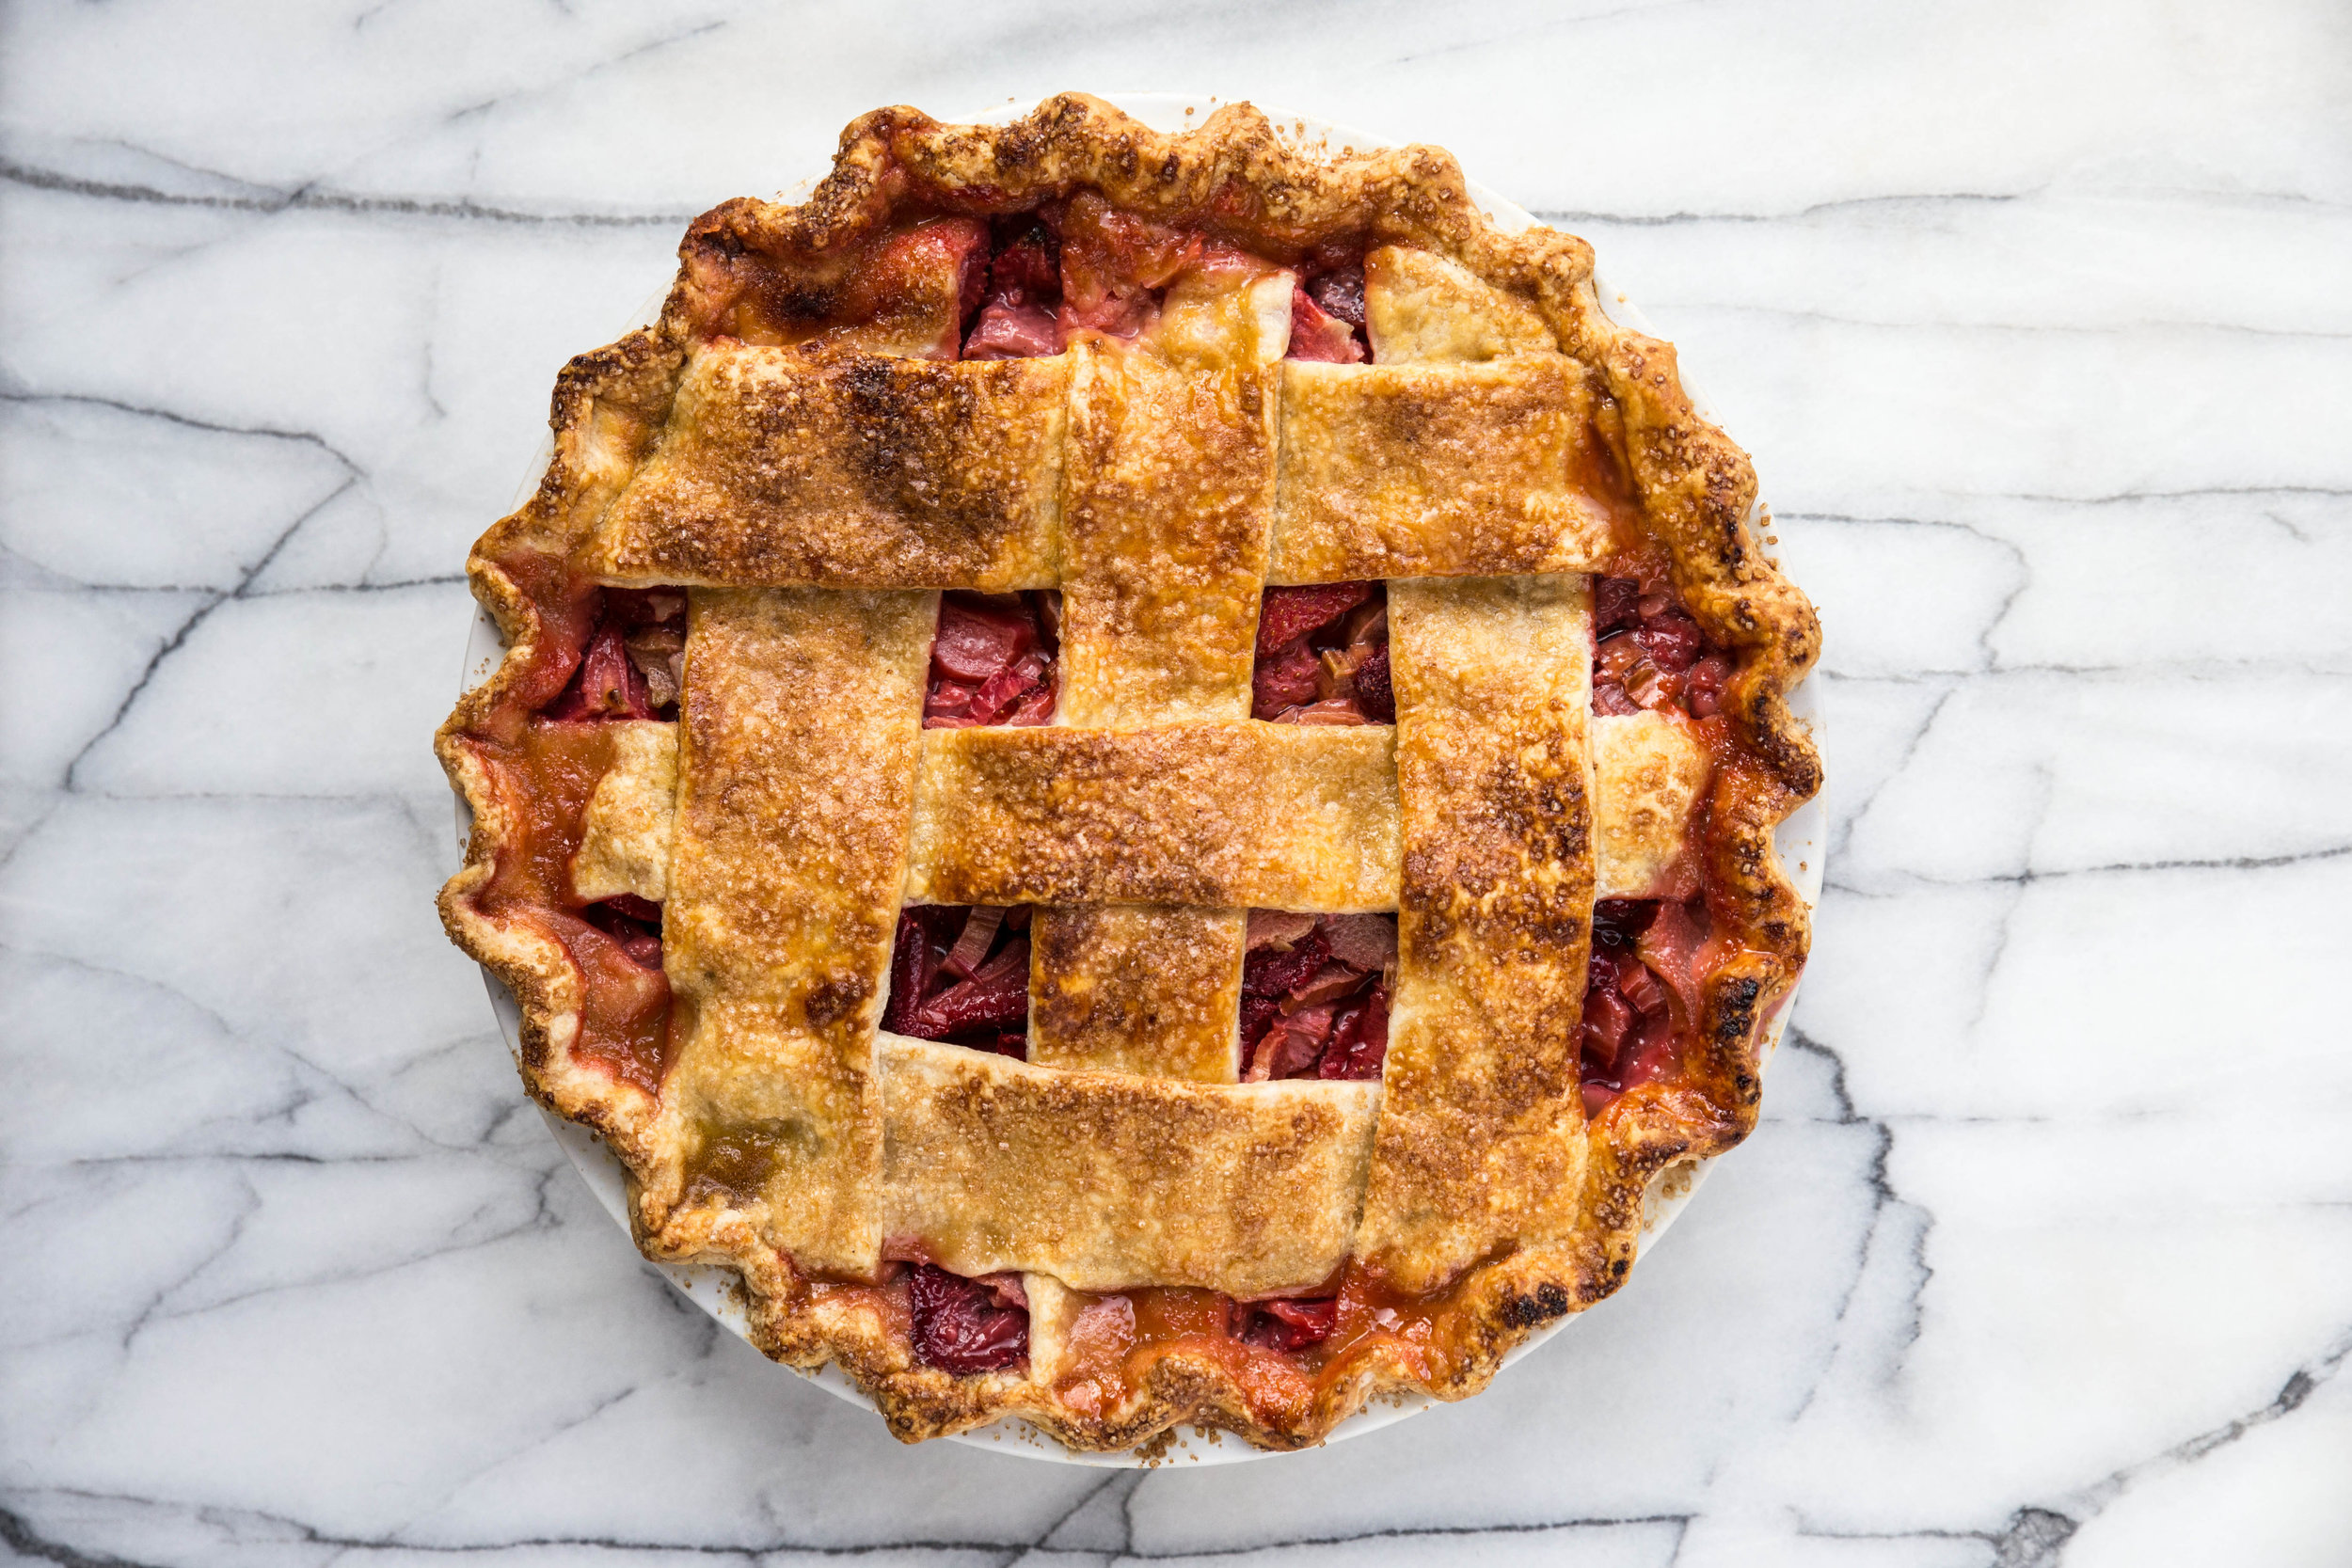
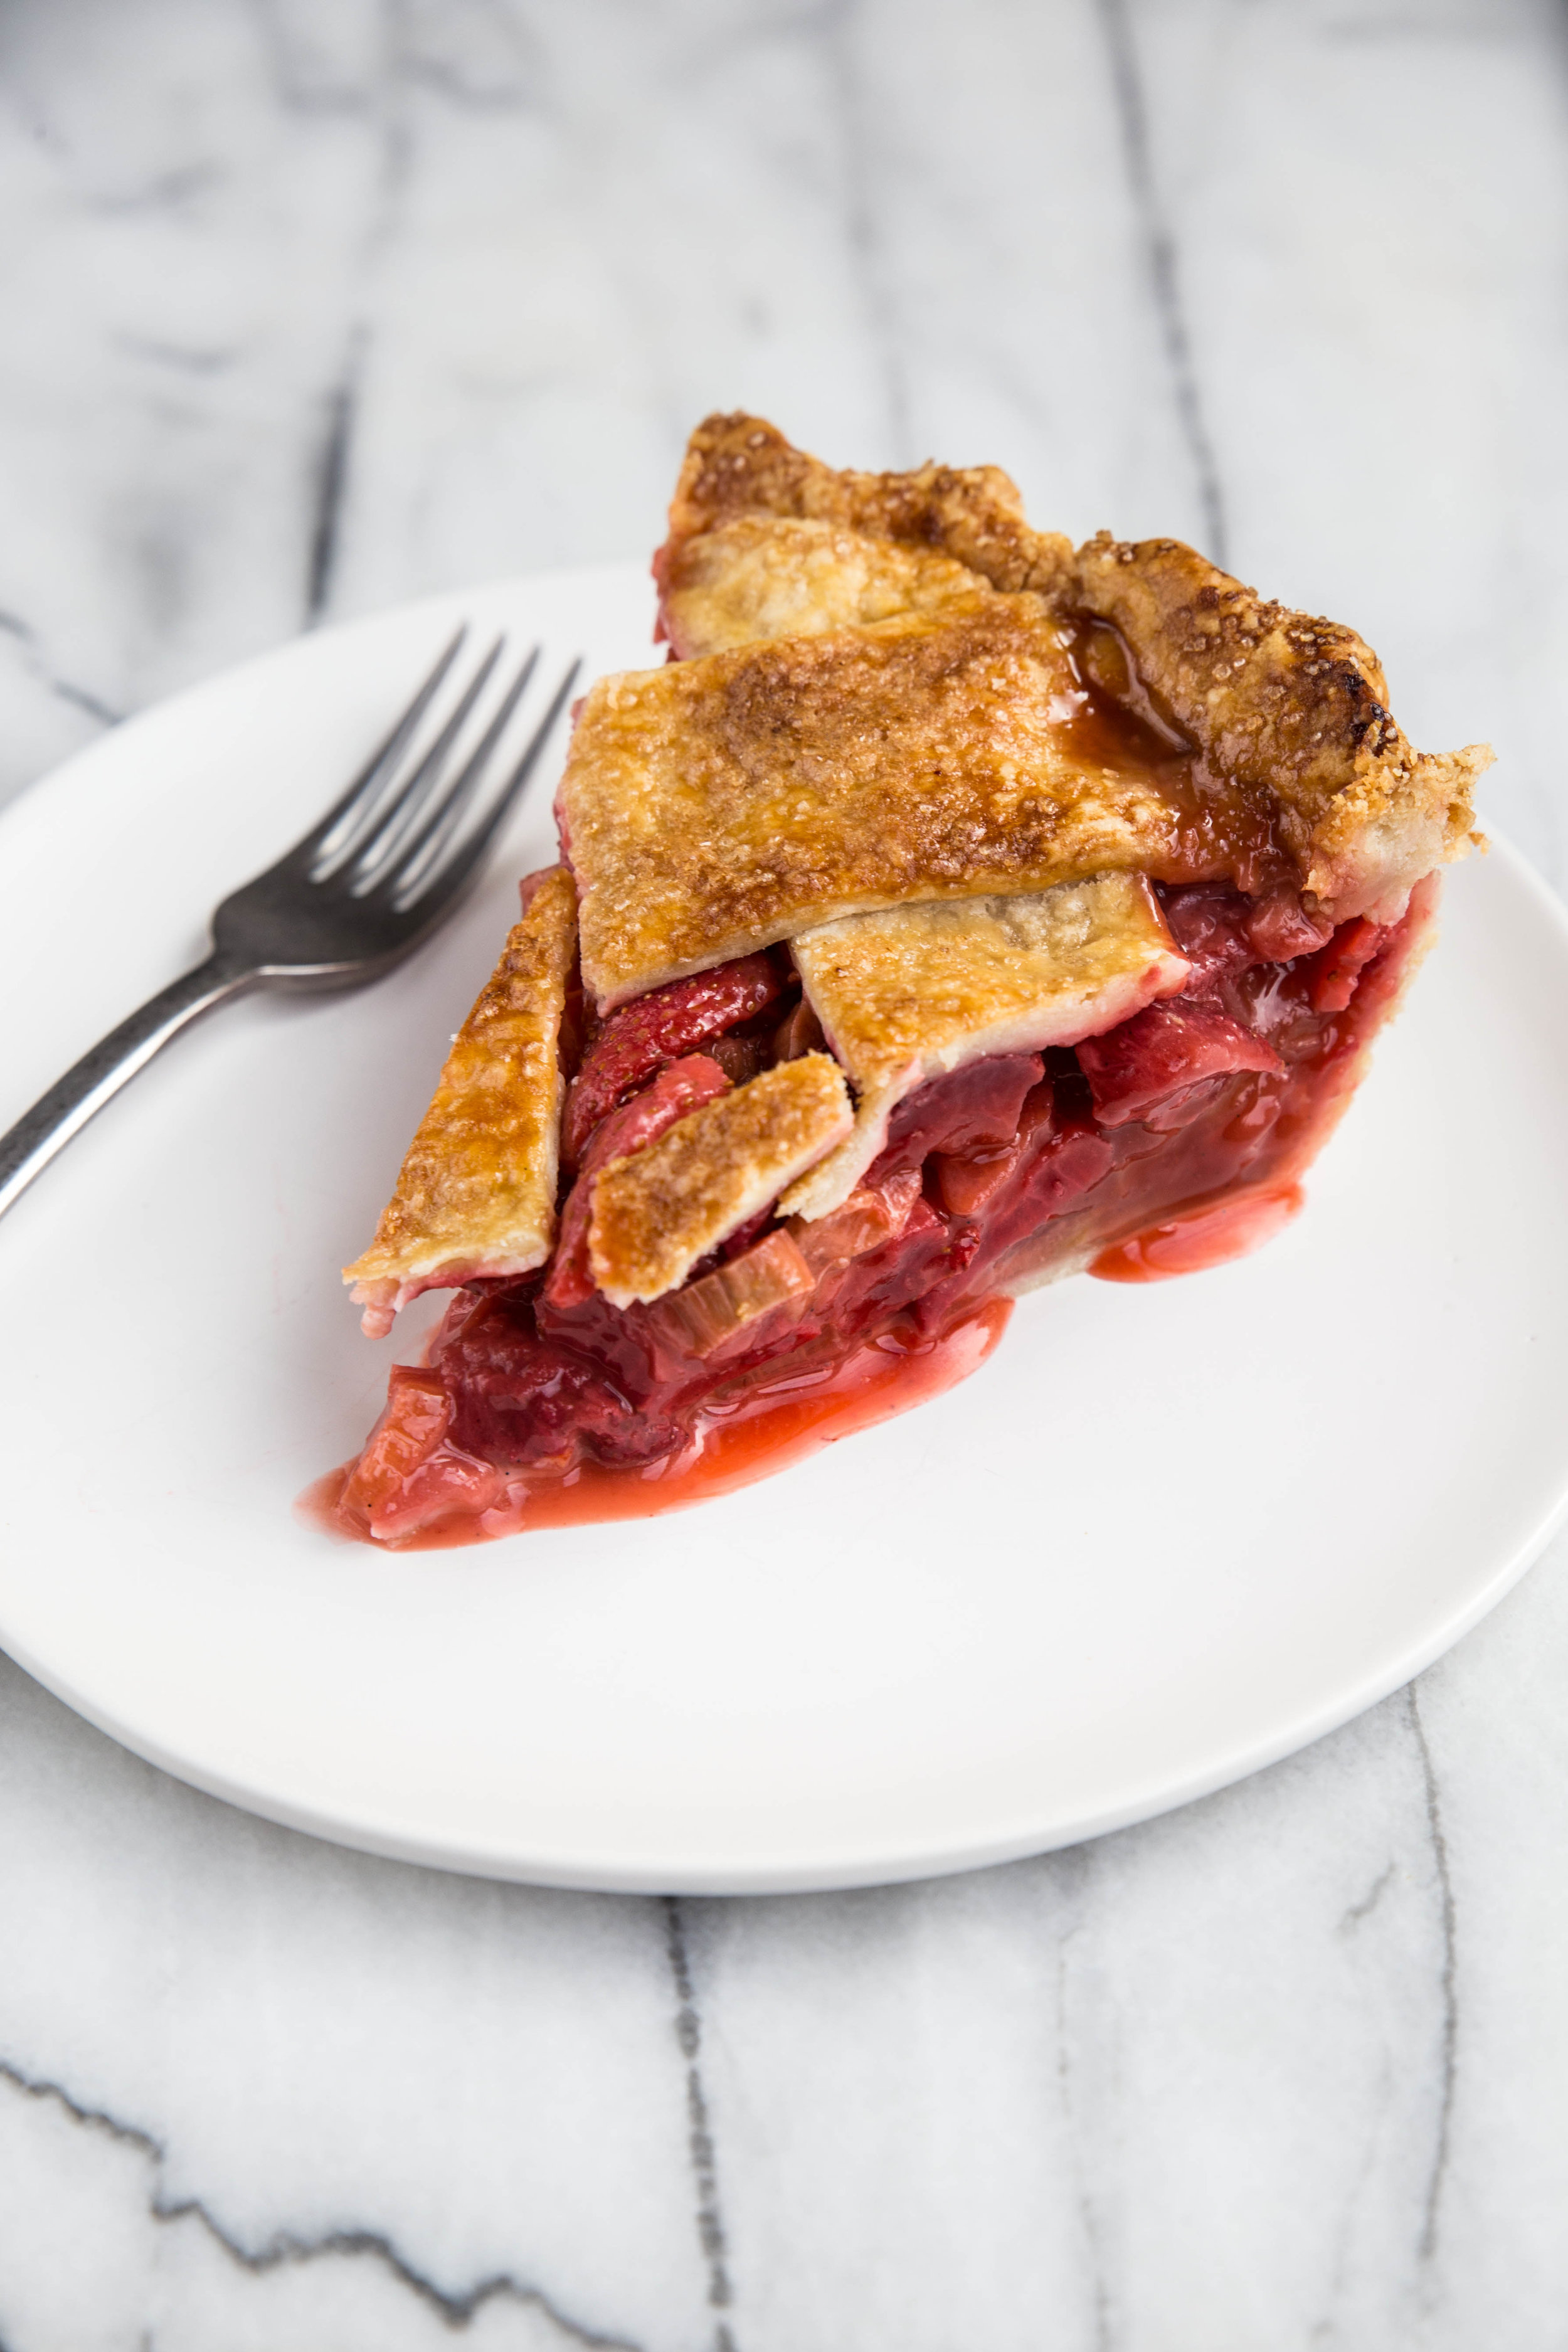
To me, it is simply not summer without a galette (as noted here, here, and here). These rustic cousins to pie are by far easier to pull together and feature the best of the ripe, seasonal fruit that summer has to offer.

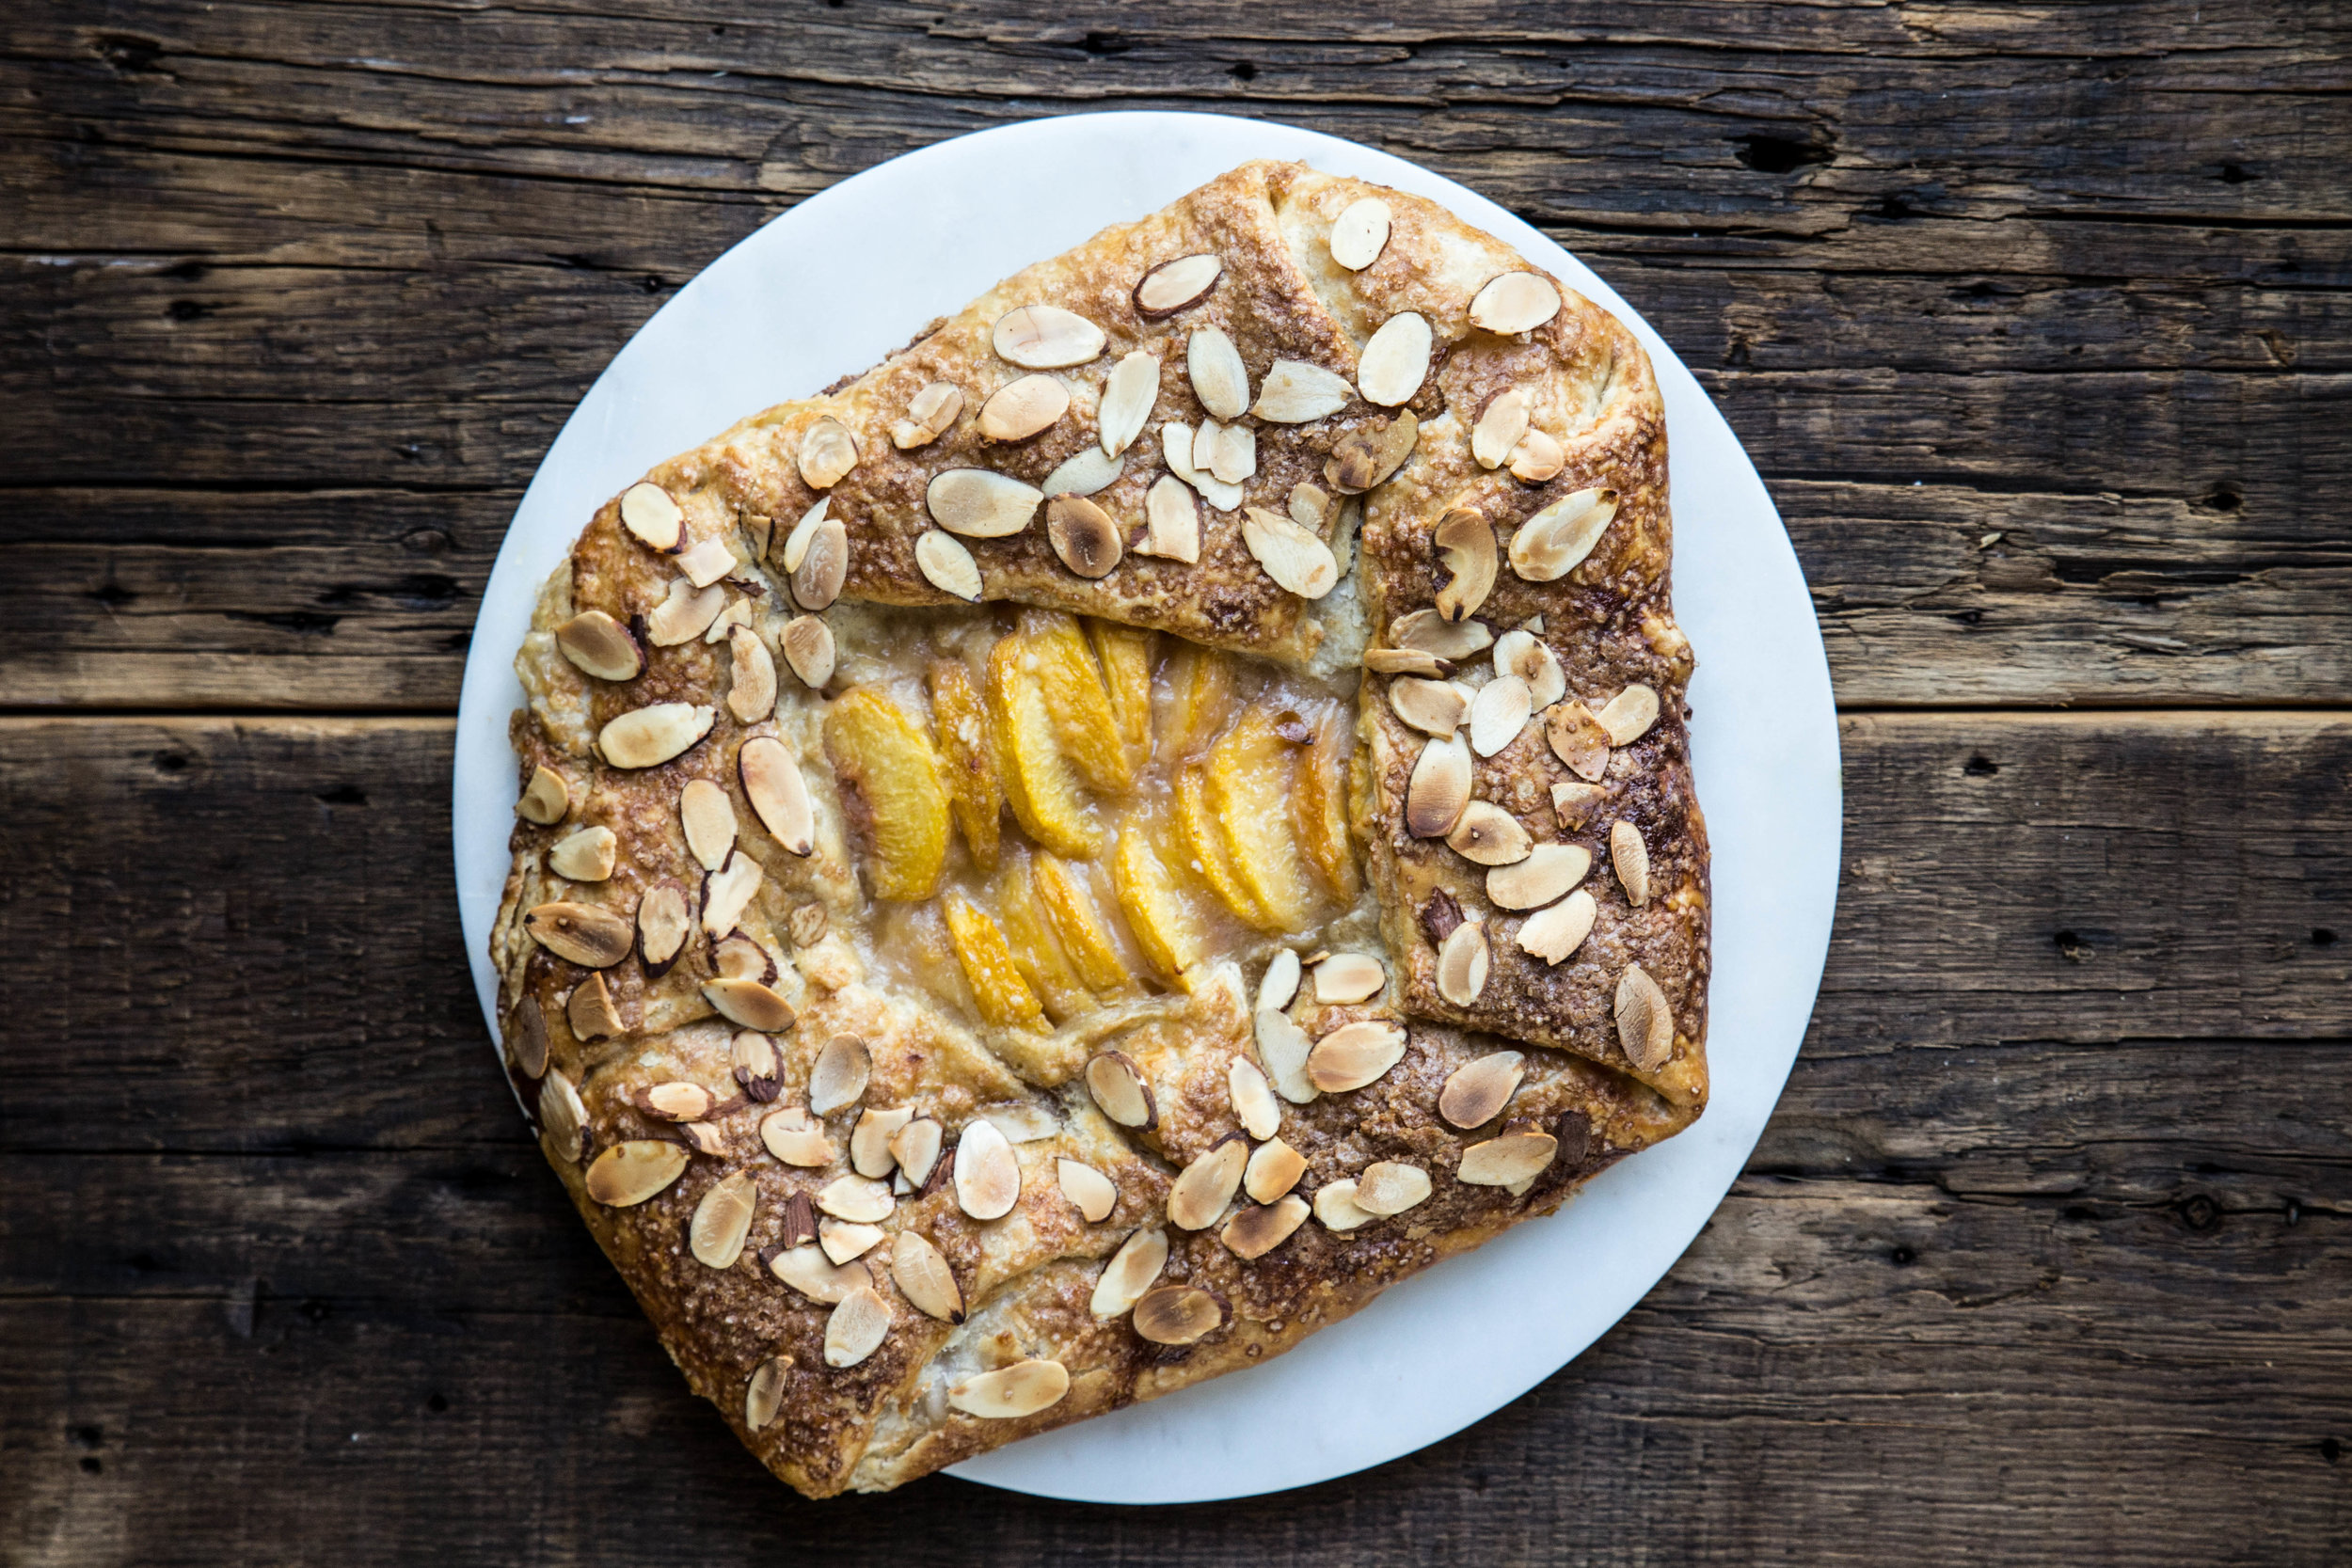
I made this Peach Almond Galette three times in the last couple weeks for various events. I simply cannot get enough of this dessert. This galette stands out because of the addition of a thin layer of almond paste beneath the fresh peaches. The rich nutty flavor elevates the galette into a true pastry.

This is truly summer on a plate.

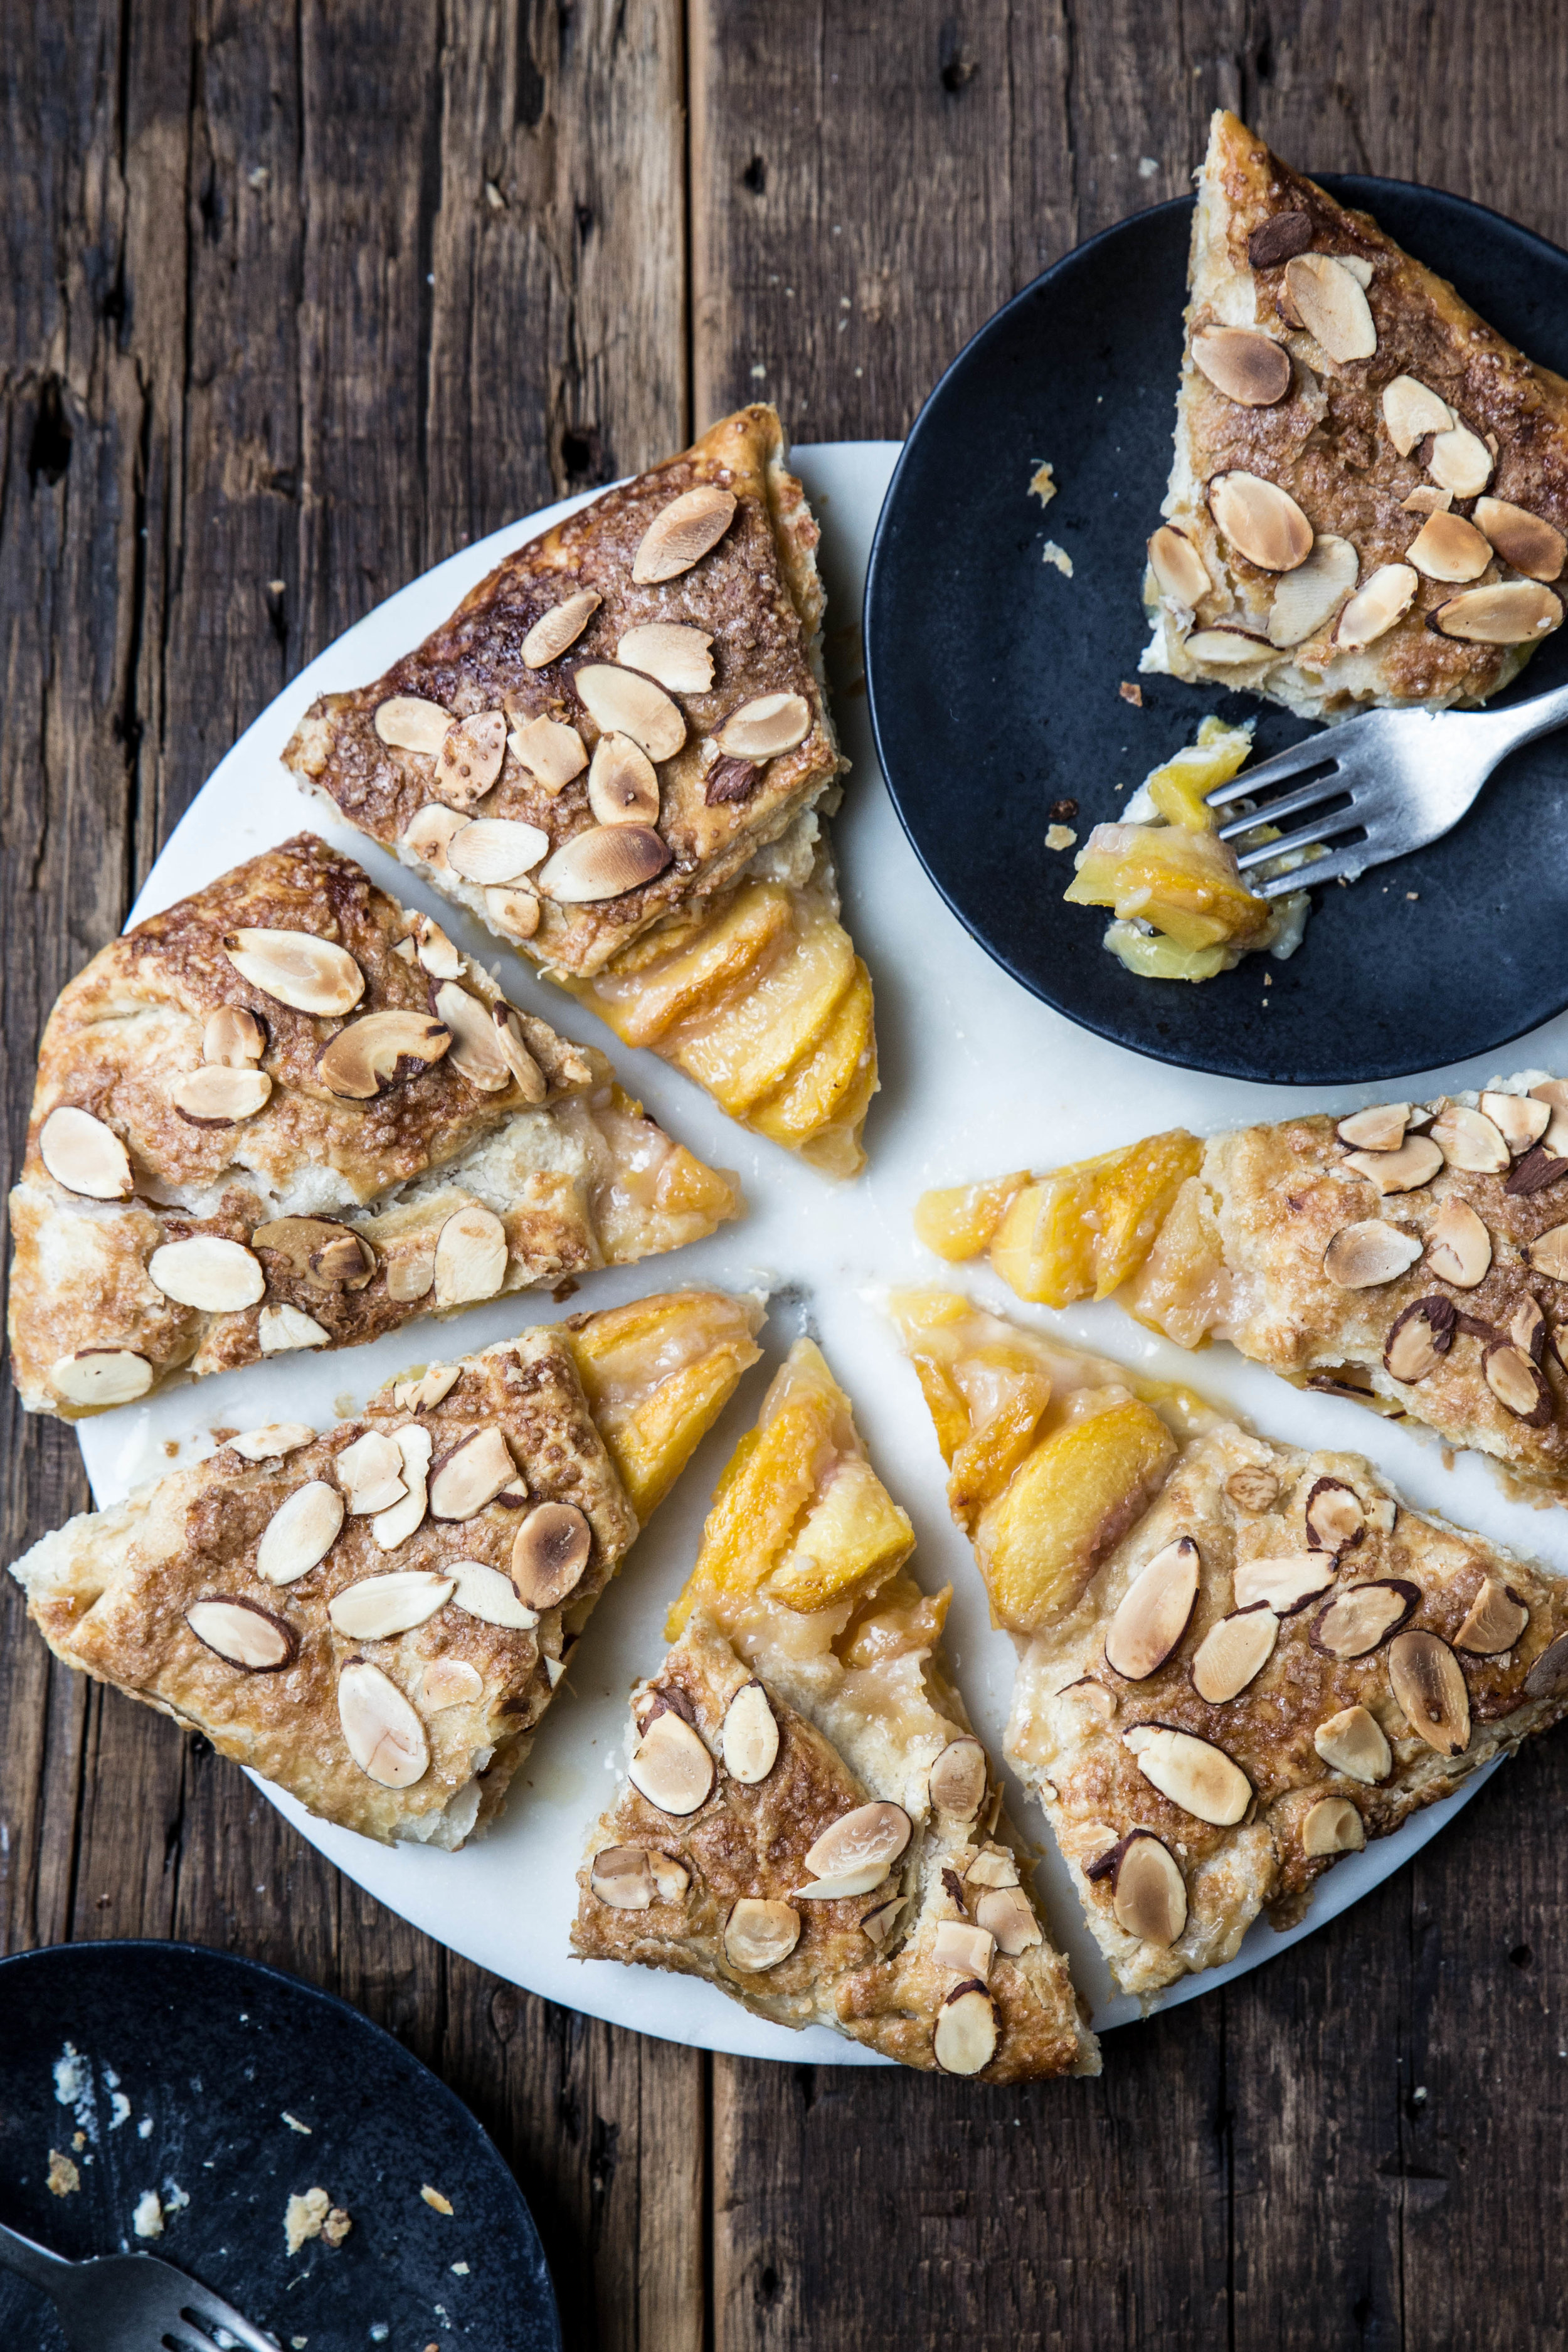
This Peach Almond Galette pairs fresh, ripe peaches with the rich, nutty flavor of almond. The galette comes together by layering almond paste between peaches and pie crust in a freeform dessert. With a sprinkling of sliced almonds and raw sugar before baking, the crust takes on the flavor of sweet, toasted almonds. While serving with a topping of whipped cream or side of vanilla ice cream would not be amiss, I prefer my slices unadorned and straight from the refrigerator. Enjoy whichever way your taste buds guide you.

Peach Almond Galette

Yields 6-8 servings, depending on size

6-7 medium sized peaches, peeled, pitted, and sliced
2 tablespoons all-purpose flour
3 tablespoons granulated sugar*
4 ounces (113 grams) almond paste
Recipe for single crust pie dough, chilled 
Egg wash (1 large egg + 1 tablespoon water, whisked)
1/4 cup (22 grams) sliced almonds
2 tablespoons demerara or raw sugar, for sprinkling

In a medium bowl, fold together the sliced peaches, flour, and granulated sugar. Set aside.

On a lightly floured surface, roll out the pie dough into a circle roughly 1/8-inch thick and approximately 14 inches in diameter. Next, roll or flatten out the almond paste into a layer approximately 1/8-inch thick. Place the thin layer of almond paste in the center of the pie dough, leaving a 3-inch border around the outside.

Layer the peaches over the almond paste in a decorative fashion. Fold up the pie dough over the filling, pleating the dough every few inches. Brush the visible pie dough with egg wash and sprinkle the sliced almonds and demerara sugar evenly over the dough. Refrigerate for 20-30 minutes to firm up the pie dough.

Preheat oven to 375 degrees F (190 degrees C).

Bake for 50-60 minutes, or until the crust is golden and the peaches have released their juices. Cool slightly before serving. Serve with a topping of whipped cream or side of vanilla ice cream.

*Add more or less to taste, depending on the sweetness of the peaches.

Blueberry Galette with Cornmeal Thyme Crust

IMG_0222-3.jpg

I'm thrilled to be officially married to my best friend! At the moment, married life does not feel very different, but I suppose when you have been together over eight years you are comfortable in your relationship. Although this day was a long time coming, it still feels strange to call Chris my husband.

Our wedding day was a hot, humid ninety-degree day with no wind to provide relief, but the rain blessedly stayed away. The sun was covered by a hazy sky from wildfire smoke which made the dappled, diffuse light perfect for photography. Although the groom was recovering from the flu, the illness was quickly forgotten in the emotion of the day. In front of our immediate family, we said our handwritten vows and became husband and wife.

Our wedding day may have had its share of imperfections, but to us these imperfections are what made it a perfect day.

With no honeymoon planned, we are trying to enjoy the last few slow days of summer as a married couple before the school year begins again. To add a special touch to our evenings, I made us a dessert to share as newlyweds. This blueberry galette made with a cornmeal thyme crust is perfect for both of us—Chris loves desserts with a chewy texture and I adore the flavor of late summer blueberries.

For this galette, the added cornmeal in the pie crust lends a chewy, flaky texture, while the fresh thyme adds a subtle herbed flavor. However, the real star of the galette is the blueberries. While the galette works beautifullywith frozen blueberries, I recommend you find the ripest berries of the season to take it over the top. The wild blueberries I found at the local farmer's market made this galette disappear quickly.

IMG_0228-2.jpg

This Blueberry Galette with Cornmeal Thyme Crust allows late summer's seasonal offerings to shine. A galette is similar in many ways to a pie, but I find it easier to throw together, which makes it perfect for the lazy days of summer. The cornmeal thyme crust gives the galette additional flavor and texture, which makes this dessert stand out from others. Serve the galette warm or cold with a scoop of ice cream or coconut whipped cream.

One Year Ago: Fresh Herb Bread
Two Years Ago:  Fig Oatmeal Bars 
Three Years Ago: Iced Matcha Coconut Latte 
Four Years Ago: Salted Chocolate Chunk Cookies & Citrus Zucchini Muffins
Five Years Ago: Blueberry Braided Bread, Date Flapjacks, & Nordic Pancake Cake
Six Years Ago: Summer Berry Pavlova, Mango Coconut Popsicles, French Silk Pie, & Blueberry Cream Cheese Cupcakes
Seven Years Ago: Coconut Pancakes, Chocolate Beet CakeZucchini Bread, & Lemon Blueberry Scones
Eight Years Ago: Chocolate Pear Cake & Brown Sugar Coconut Bubble Tea

Blueberry Galette with Cornmeal Thyme Crust

Yields 8-10 servings

Cornmeal Thyme Pie Crust
1 3/4 cups (210 grams) all-purpose flour
3/4 cup (108 grams) yellow cornmeal
1/2 teaspoon salt
1 tablespoon granulated sugar
1 tablespoon fresh thyme, chopped and lightly packed
1 cup (225 grams) butter, cold and cubed
4-8 tablespoons ice water

In a large bowl, whisk together the flour, cornmeal, salt, sugar, and fresh thyme. Add half of the cold cubed butter and rub the butter and flour between your fingers until it resembles coarse sand. Add the second half the cubed butter and rub in into the flour, but leave it in larger pieces (approximately the size of your thumbnail). Add four tablespoons of ice water and mix the dough together until uniform. Gradually add more water, one tablespoon at a time, until the dough holds together when squeezed in your hand. 

Place the dough on parchment paper and use the paper to press the dough into a uniform disk. Wrap in plastic wrap, and chill for at least a half hour (or up to 2-3 days). For a step-by-step tutorial in making pie dough, follow the instructions here.

Blueberry Filling
2 pints (24 oz or 680 grams) blueberries
2 tablespoons cornstarch
3 tablespoons granulated sugar*
Egg wash (1 large egg + 1 tablespoon water, whisked)
2 tablespoons demerara or raw sugar, for sprinkling

In a mixing bowl, fold together blueberries, cornstarch, and sugar until uniform. Set aside.

On a lightly floured surface, roll out the pie dough into a circle roughly 1/8-inch thick. Place the blueberry mixture into the center of the circle and spread out until it is a uniform thickness, leaving a two-inch border on all edges. Fold the border of the pie dough over the filling, pleating the dough every two or so inches. Brush the visible pie dough with egg wash and sprinkle the demerara sugar evenly over the dough and the filling. Refrigerate for 20-30 minutes to firm up the crust.

Preheat oven to 400 degrees F (204 degrees C).

Bake for 40 to 50 minutes, or until the crust is golden and the blueberries have released their juices. Cool slightly before serving. Serve with a topping of whipped cream or side of vanilla ice cream.

*Add more or less to taste, depending on the sweetness of the berries.

Strawberry Rhubarb Pie

Summer is moving quickly. It feels like only a moment has passed since school ended and summer vacation began. I've been working on a project of sorts, which has made free time feel scarce. While I'm going to keep it under wraps a little while longer, I'm excited to share the details with you soon!

In the quiet, everyday moments, I remember to enjoy these summer days. I savor time on the deck watching the vegetable and herb garden grow (perhaps too much , as they have quickly escaped the confines of their planters). I remind myself to turn off the background noise in my life (television and cell phone) to bring my thoughts back down to earth.

And, of course, I bake.

strawberryrhubarbpie1.jpg

I made this pie a couple of weeks ago, and am finally getting a chance to share it with you. With strawberries and rhubarb in full season, and a holiday around the corner, the timing still feels right. This pie takes full advantage of late spring and early summer's offerings.

I prefer a pie with a bit more bite, so the recipe below results in a pie with a tarter flavor. However, if your tooth is a bit sweeter, add another 1/4 cup of sugar to bring the sweetness to your liking. With a scoop of vanilla ice cream on top, this pie will be sure to please.

IMG_9696-2.jpg

This Strawberry Rhubarb Pie celebrates the seasonal produce of June. Two pints of strawberries and a handful of rhubarb stalks come together in this brightly flavored pastry. With cornstarch to thicken, the pie and its juices set up nicely. Serve with a large spoonful of whipped cream or scoop of ice cream to share.

One Year Ago: Chocolate Peanut Butter Pie
Two Years Ago: Dulce de Leche Cake
Three Years Ago: Strawberry Layer Cake & Blueberry Oat Crumble Muffins
Four Years Ago: Mango MargaritaChocolate Cacao Nib Banana Bread, & Chocolate Espresso Custard
Five Years Ago: Vanilla Chia Pudding, Rhubarb Vanilla Pound Cake, Boozy Margarita Lime Cake, & Double Chocolate Muffins
Six Years Ago: Toffee Chocolate Chip Cookies, Coconut Nutmeg Pudding, Lavender Lemonade, & Vegan Chocolate Cupcakes
Seven Years Ago: Whole Wheat Chocolate Chip Cookies, Garlic Parmesan Pull-Apart Bread, & Chocolate Almond Oat Bars
Eight Years Ago: Chocolate Coconut Granola, Bittersweet Chocolate Sherbet, & Tapioca Pudding

Strawberry Rhubarb Pie

Yields one 9-inch pie

1 double crust pie dough recipe
2 pints (24 ounces or 680 grams) strawberries, hulled and sliced
10 ounces (280 grams) fresh rhubarb, sliced into 1/4 inch pieces
1/2 cup (100 grams) granulated sugar
1/4 cup (50 grams) brown sugar, packed
1 teaspoon vanilla extract
4 tablespoons cornstarch
Egg wash (1 large egg + 1 tablespoon water, whisked), for brushing
Raw or demerara sugar, for sprinkling

Preheat oven to 425 degrees F (220 degrees C).

In a large mixing bowl, gently stir together the sliced strawberries, rhubarb, sugars, vanilla, and cornstarch until evenly coated. Set aside.

Form the pie dough into a disk and divide it into a 60/40 ratio (if using a store-bought crust, do not worry about this step). On a lightly floured surface, roll out the larger section of dough into a 14-inch round circle. Carefully transfer it to a 9-inch pie pan and trim the excess pie dough to create a 1-inch overhang. Fill the pie crust with the strawberry-rhubarb mixture.

On a lightly floured surface, roll out the smaller section of pie dough. Using a pizza cutter and a ruler, cut out wide strips of dough. Layer the strips over the top of the pie in a decorative fashion and trim so they are even with the edge of the pie pan. Using your fingers, pinch the bottom and top layers together in a pattern of your choice.

Using a pastry brush, brush the top of the pie crust with egg wash and sprinkle raw sugar over the pie. Bake the pie for 15 minutes at 425 degrees F (220 degrees C). Then, lower the oven temperature to 375 degrees F (190 degrees C). If necessary, cover the edges of the pie crust with aluminum foil to prevent further browning. Bake an additional 50-65 minutes, or until the lattice and crust are evenly browned. 

For perfect slices, cool for at least 3-5 hours (or overnight). Serve with whipped cream or ice cream, if desired.