Pear Spiced Sangria

After moving to the cities in August, there is now enough distance between my family and me that it's easier to board a plane than drive a car to cut across it. With my loved ones no longer so near, I appreciate the time we have together on a different level. It was easy to take our time together before the move for granted, this realization only coming into focus now that the situation had changed. I fly out soon for the Thanksgiving holiday, ready to put aside my day-to-day stresses to concentrate on what really mattersβ€”the people I am most grateful for this time (and every time) of year.

We may have hundreds of miles between us, but my family will always be my home.

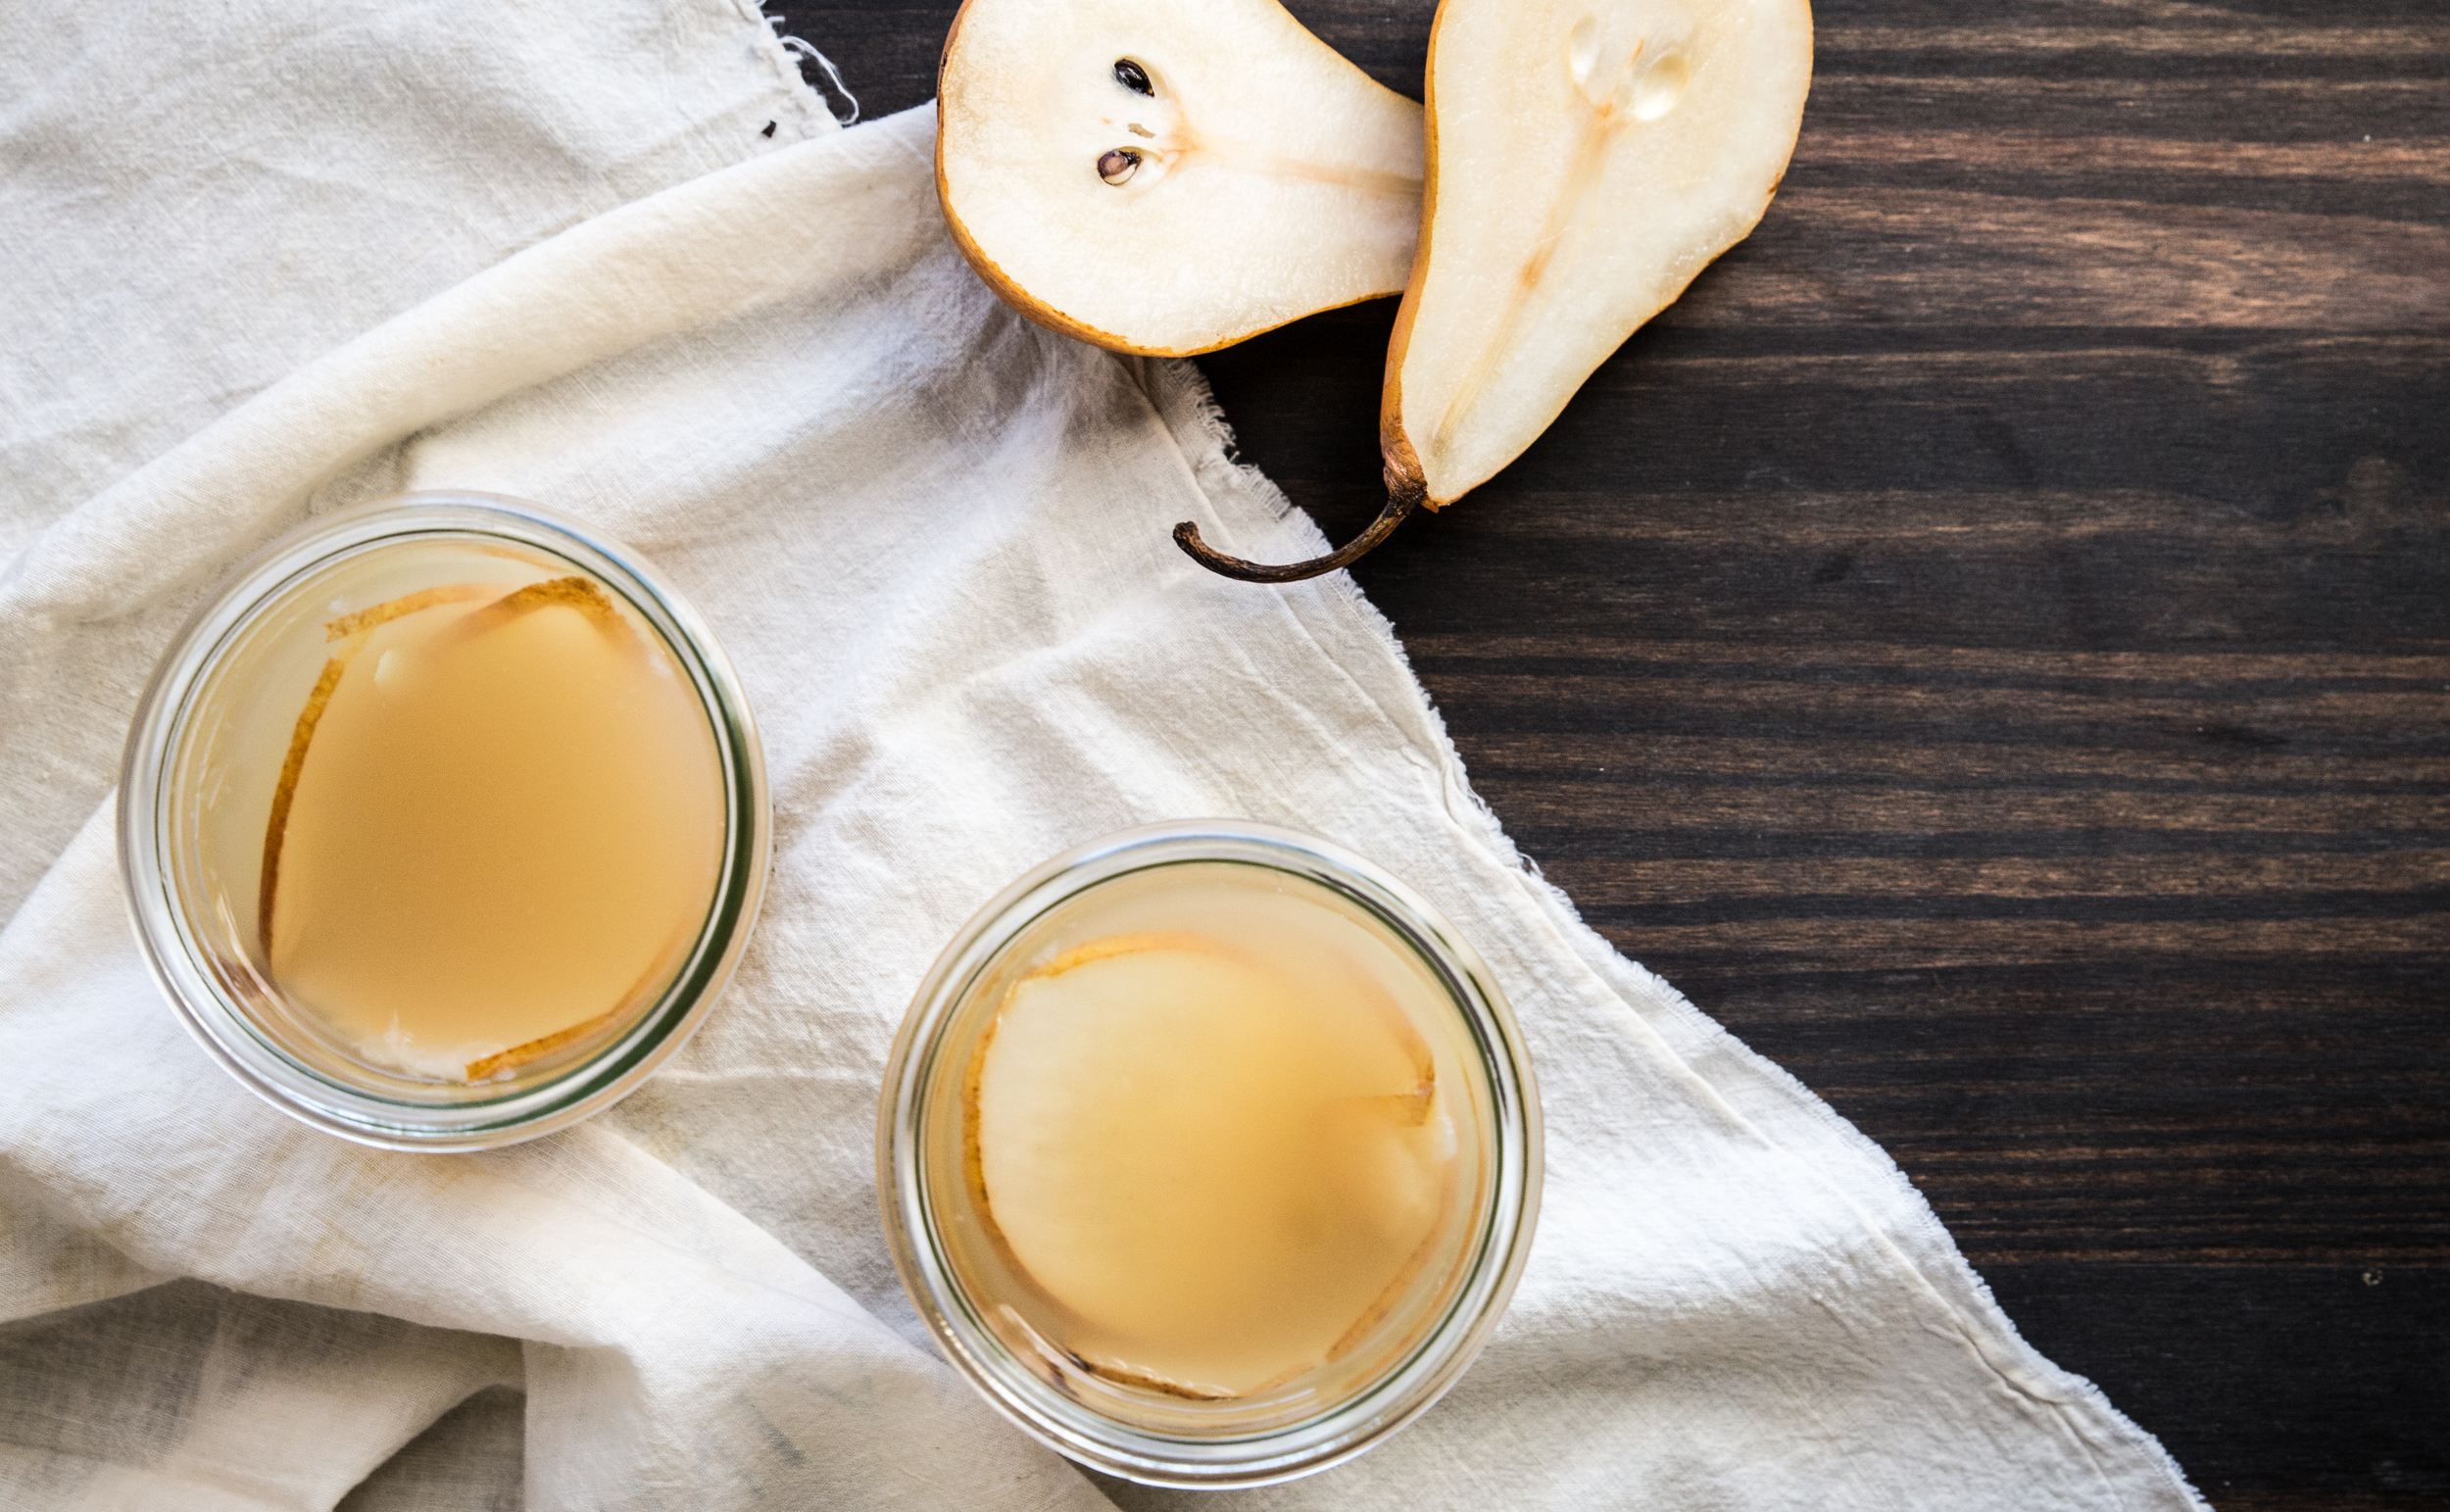
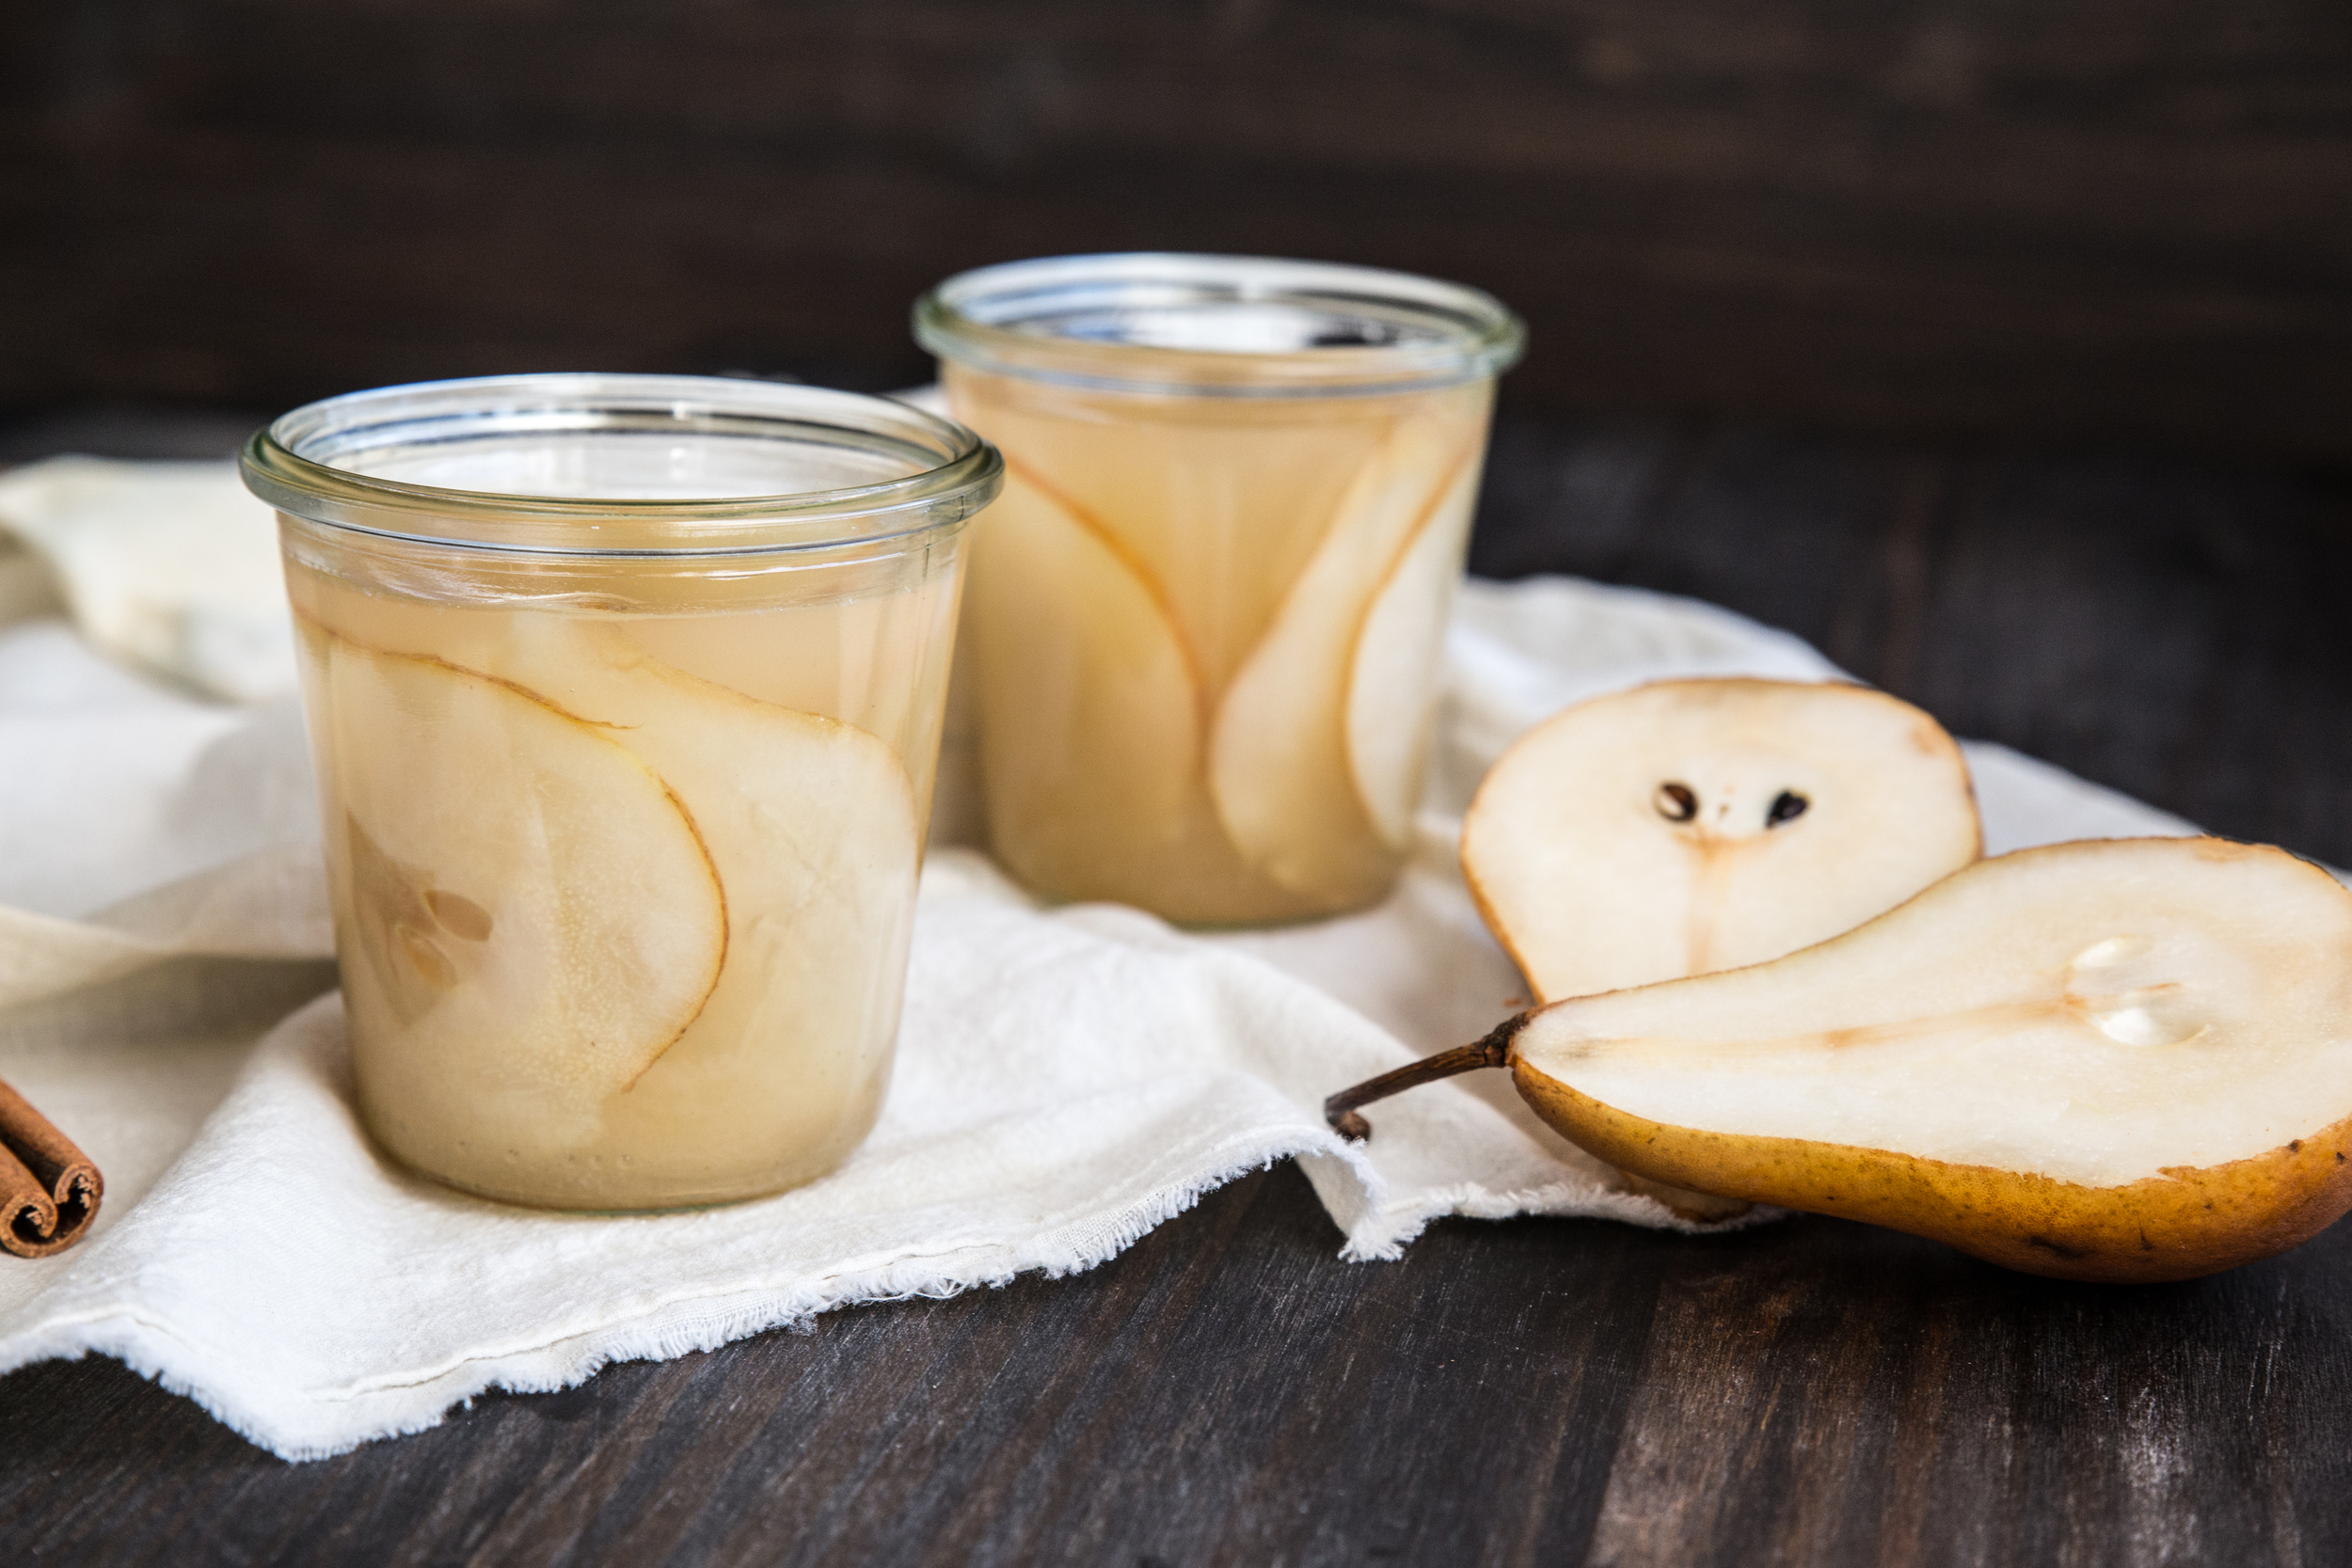
I enjoy the hunt of finding a seasonal drink that friends and family can share during holiday get-togethers. Pears are a favorite autumn fruit. Even though the profile is subtle, the tender white fruit brings a unique sweetness and aroma. The challenge was to pull out this character and find a way to allow it to shine. Since the flavor of the fruit mimics the quality of a fine wine, it seemed natural to pair them. Balanced with cinnamon and the deep vanilla tones of brandy, this sangria brings the spices of the holidays together.

In preparation, allow the sangria to rest overnight before servingβ€”it needs time for the flavors to merge and develop.

Pear Spiced Sangria brings together the holiday flavors in this drink to share. Dry white wine, brandy, and pear juice are stirred together to form the base. Sliced pears and cinnamon sticks, when stewed overnight, add an extra touch of flavor and spice. The drink can be served with or without the fruit, but company is always welcome. 

One Year Ago: Glazed Chocolate Cake Doughnuts
Two Years Ago: Pumpkin Streusel Muffins
Three Years Ago: Maple Roasted Chickpeas, Gingerbread Muffins, and Persimmon Cake
Four Years Ago: Cranberry White Chocolate Tarts, Pumpkin Granola Bars, and Banana Cocoa Smoothie
Five Years Ago: S'mores CupcakesChocolate Espresso Pots de Creme, and Sugar Coated Daydreams

Pear Spiced Sangria

Yields 6-8 servings

1 bottle (750 mL) dry white wine*
1/2 cup (120 mL) brandy
1 1/2 cups (350 mL) pear juice
2 firm, ripe bosc pears, thinly sliced**
2 cinnamon sticks

In an airtight container, stir together the wine, brandy, and pear juice. Add the sliced pears and cinnamon sticks. Allow to rest overnight (12-18 hours) in the refrigerator.

Remove fruit and cinnamon sticks by running mixture through a fine mesh strainer. To serve, add a few pear slices to each glass (optional).

*For the wine, I used Santa Margherita Pinot Grigio. I recommend using a dry wine instead of a sweet wine (like a moscato). The  pear juice adds a significant amount of sweetness and using a dry wine prevents the sangria from becoming too sweet.

**I recommend bosc pears because they have a firmer texture which holds up better in the drink. Bartlett pears have a tendency to disintegrate in the liquid. I sliced the pears using a mandolin on a thick setting.

Rosemary Olive Bread

The season of comfort foods and warm stews is upon us. Along with the holiday table classics, my dinner table features homemade breads for soaking up gravy and mashed potatoes. In years past, I have filled the bread basket with soft honey rolls, sweet cranberry orange brioche buns, and lightly spiced pumpkin rolls. As my love for crusty bread grows ever stronger, this year's table will feature a loaf with a thick crust and soft interiorβ€”a texture perfect for mopping the plate clean.

In partnership with King Arthur Flour, each month I want to challenge you with a new recipe, filled with explanations and fresh techniques to help you grow and develop as a baker. This month we're tackling the crusty loaf and learning how to create it in your own kitchen. The recipe may appear long or complicated at first glance, but these are many details to make the new techniques easier for you. The recipe is at the same difficulty level and takes the same amount of active time as a traditional loaf of bread.

The bread starts with a poolish, which is a French term for a pre-ferment. A pre-ferment is exactly as it soundsβ€” dough that has been fermented before baking. The poolish is created the evening before by mixing together flour, water, and a pinch of yeast. Covered tightly with plastic wrap, it is left to rest overnight at room temperature for 12-18 hours. The ideal time for this poolish to be ready is roughly 15 hours, but bread is incredibly forgiving and the poolish will adjust to your own schedule. 

The poolish has a dual purpose: the fermentation adds a greater complexity of flavor to the bread and it helps the baked bread keep for a longer period of time. When ready, the poolish will have a uniform bubbled appearance, shown above.

When the remaining ingredients have been added to the bread, the dough will be very sticky. Contrary to popular belief, this is exactly what we want. A "wet dough" will yield a loaf with an open crumb, which results in a tender interior, and a firmer crust. Although you will have a strong temptation to add more flour, don't do it. Instead, we will knead the dough using wet dough techniques.

The use of a bench knife will be incredibly helpful for the next few steps.

Turn the dough out onto a clean, flourless surface (wooden cutting boards work best, but I have used a clean counter top with no issue). To knead the wet dough, form the dough into a log shape with your bench knife and, starting at one end, cut the dough at roughly a 45 degree angle. Continue the cutting motion, slicing the dough into 4-5 pieces. Use the bench knife to slide the dough pieces back together, rotate the loaf a quarter turn, and repeat the slicing process. Continue kneading in this manner for 3-5 minutes.

The process of cutting the dough helps the gluten to form quickly. After a few repetitions of the kneading process, you will notice the dough change texture. It will go from soft and lax to holding itself together in a tighter formation. When the dough has visibly changed textures (less sticky) and becomes difficult to slice, it is time to change kneading techniques.

rosemaryolivebread6.jpg

The second kneading technique will strengthen the dough and give it elasticity. Using the bench knife, bring the dough into a log shape. The long edge should be facing you. About 1/3 of the way in, pick up the dough with the tips of your fingers (no palms). Imagine picking up a cat under the front paws; the motion is similar. Rotate the dough 90 degrees and slap the bottom of the dough against the surface, pulling the top half of the dough back with your fingers to stretch it. Fold the dough back onto itself by bringing your hands down over the top of the dough, touching the surface, and pulling your hands out sideways to break free. This will help minimize sticking. Every few motions, scrape the surface clean with a bench knife to keep the dough together. 

Be aggressive and move quickly with the dough or it will stick to the table and be more difficult to work with. Don't be afraid of kneading incorrectly; you'll pick up the technique quickly when you can feel how your motions affect the dough. After 3-5 minutes of kneading, the dough will be ready. It will have a smooth appearance, lose much of its stickiness (you should be able to poke the dough without it sticking to your finger), and feel like a muscle (elastic). 

To clean your hands of sticky dough while kneading, rub them with a small amount of flour. The dough will come off easily, making it faster and less messy than using water or a towel. 

Place the kneaded dough into a bowl, cover, and let it to rise until it doubles in volume. This will take anywhere from 1-2 hours depending on the temperature of the room. I recommend putting the dough into a container with volume measurements (like the dough doubler pictured above)β€”it makes it easy to see exactly how much your dough has risen and how much farther it has left to go.

rosemaryolivebread1.jpg

When the dough has doubled in volume, turn it out onto a very lightly floured surface to prevent any sticking. (1) Take the corners of the dough and pull them into the center of the loaf. (2) This will create a square or rectangular appearance. (3) Then, take two adjacent corners and fold them in to form a triangular end. (4) Starting on this end, roll the dough into itself tightly, forming a loaf shape. Place the loaf seam side down onto parchment paper, cover with a towel, and let it rise until doubled in volume (30-40 minutes).

Before forming the loaf, turn on the oven to preheat the baking stone in the middle rack of the oven. It takes much longer than the oven to come to full temperature and should be given plenty of time to heat. I heat the oven while the bread completes its second rise. The use of a baking stone helps the loaf bake evenly by dispersing the heat evenly and helps the bottom of the loaf become crusty without burning. If you don't have a baking stone, a thick baking sheet can be used as a substitute. Place a cast iron pan (or edged broiler pan) on a different rack below the baking stone to heat as well; this will be used to create steam.

Just before baking, slash the loaf no more than 1/4" deep with a lame (or sharp knife) in a decorative pattern (I made a leaf). The slashes allow the loaf to rise evenly, with no breaks along the sides or top.

Use parchment paper to slide the dough onto the heated baking stone in the oven without disturbing the shape. Next, pour 1/2 cup water into the cast iron pan on the rack below. Quickly shut the oven door to trap the steam. The steam helps the bread rise and helps create the firm crust on the final loaf. The bread is ready when it has a well caramelized appearance and firm crust on all sides. Allow the bread to rest for 10-15 minutes before slicing. This will allow the moisture to distribute evenly and set the interior texture.

Rosemary Olive Bread is a hearty, full bodied bread to serve with warm dinners and stews. The fresh rosemary lends a subtle flavor, breathed in with each bite; the olives have a pleasant, salty flavor. Even though the olives are pervasive throughout the loaf, only the larger pieces provide strong flavor. These quiet flavors do not overpower, making this a versatile dinner loaf, whether it is served with a spread of butter or used to soak up a hearty stew.  

One Year Ago: Pumpkin Pie (Dairy-Free)
Two Years Ago: Stovetop Popcorn and Gingerbread Bundt Cake with Pear Caramel Glaze
Three Years Ago: Marbled Butternut Squash Bread, Chai Pear Scones, Hot Bourbon Apple Cider, and Pumpkin Pie Espresso Bars
Four Years Ago: Banana Muffins, Cranberry Orange Brioche Rolls, and Cranberry Sauce
Five Years Ago: Cranberry Cocoa Cinnamon Rolls, 30 Second Sangria, and Raspberry Vanilla Creme Brulee

Rosemary Olive Bread

Yields 1 loaf

Poolish
1 cup (120 grams) King Arthur Unbleached Bread Flour
3/4 cup (177 mL) water
1 pinch (approximately 1/16 teaspoon) active dry yeast

Final Dough
2 cups (240 grams)  King Arthur Unbleached Bread Flour*
1/2 cup (118 mL) water
1 tablespoon fresh rosemary, chopped (or 1 teaspoon dried rosemary)
1/3 cup (50 grams) Kalamata black olives, chopped and patted dry
1 teaspoon active dry yeast
1 teaspoon salt

To create the poolish, stir together the flour, water, and a pinch of yeast the evening before baking. Cover tightly with plastic wrap and allow to rest for 12-18 hours at room temperature. The poolish will have a bubbled appearance when ready.

To create the final dough, add the remaining ingredients to the poolish and fold until uniform. The dough will be sticky; resist the temptation to add any additional flour. Turn the dough out onto a clean, flourless surface. To knead the wet dough, form dough into a log and, using a bench knife, cut the dough at an angle into 4-5 slices. Use the bench knife to bring the dough back together into the log shape and repeat the slicing process. Continue kneading for another 3-5 minutes. The dough will gradually change texture as the gluten forms.

When the dough easily holds together, form the log shape and, using your hands, pick up the dough 1/3 from the top of the log. Rotate the dough 90 degrees and "slap" the bottom of the dough onto the surface while pulling the top half of the dough towards you. This will stretch the dough. Fold the dough back onto itself by bringing your hands down over the top of the dough, touching the surface, and pulling your hands out sideways to break free. Repeat the process. This step must be completed quickly or the dough will stick to the surface. Use a dough knife to clean the surface as needed. Continue kneading for another 3-5 minutes. The dough will become easier to work with and have a smooth, elastic appearance when ready.

Place dough into a bowl and cover, allowing it to rise an additional 1-2 hours, or until doubled in size.

Preheat oven and baking stone (or cookie sheet) to 450 degrees F (230 degrees C). Place a cast iron pan (or edged broiler pan) on the bottom rack.

Turn out dough onto a very lightly floured surface and bring all four corners of the dough together until it resembles a rectangular shape. Take the two bottom corners together and fold them in again, creating a triangular shape on the edge. Begin rolling the dough from this end onto itself, placing the roll seam side down to create a loaf shape. Place on parchment paper and cover with a clean dish towel. Allow to rise an additional 30-40 minutes.

Using a lame (or sharp knife), slash a design into the top of the loaf. Slide the parchment paper onto the baking stone in the oven and quickly pour 1/2 cup water into the cast iron pan before closing the oven. This will create steam; do not open the oven door. Bake for 30-35 minutes, or until the loaf is well caramelized and the edges are very firm. Cool for 10-15 minutes before slicing and serving.

To restore the "crustiness" of the crust after the loaf has been stored, reheat in a 350 degree F (180 degree C) oven for 5-10 minutes, or until crusty.

*If using all-purpose flour, use only 1/2 cup water in the poolish instead of 3/4 cup. Bread and all-purpose flour absorb different levels of water and the recipe needs to be adjusted to accommodate this.

This post is sponsored through a partnership with King Arthur Flour. All thoughts and opinions are my own. 

Caramel Apple Crumble Pie

The days have been blurring together, an amalgam of daily commutes, hastily pieced together dinners, and the bright glow of the television screen. Each day feels the same in color and energy as the one that came before it. This routine, exciting once, grows monotonous. While the familiarity may be comfortable, the pattern feels stagnant and tired.

After weeks of this repetition, I needed variety, a fresh feeling and a new experience. So I took it upon myself to make a change. I joined a hot yoga studio. I signed up for glass blowing classes. I announced to my boyfriend that we were going to go for a walk.

Sometimes I forget I have the power to change my everyday. 

Baking is one of the activities I do to keep life interesting. As a recipe developer, I rarely come back to the same recipes once they are complete, trying to invent new takes on old favorites instead. The dessert table becomes an ever evolving area of flavors and textures. This Caramel Apple Crumble Pie was born from a combination of two of my favorite fall desserts: apple crisp and apple pie

While there will be a few failures now and then, when the recipe comes together as easily as this recipe did, it turns out right.

IMG_9890.jpg
IMG_9946.jpg

Caramel Apple Crumble Pie brings together spiced apples, flaky pastry, and a crisp oatmeal crumble. Drizzled in warm caramel, the dessert becomes a play on autumn flavors and textures. Serve with vanilla ice cream and enjoy alongside friends and family.

One Year Ago: Maple Syrup Cake with Toasted Almonds
Two Years Ago: Butternut Squash Biscuits, Apple Crisp, and Pumpkin Spiced Doughnuts
Three Years Ago: Pear Crisp, Pumpkin Rolls, Butternut Squash Cake, and Filled Molasses Cookies
Four Years Ago: Applesauce, Caramel Apple Cider, Honey Cinnamon Chickpeas, and Caramel Apple Tart
Five Years Ago: Apple Chips, Apple Cider, Ginger Pear Cake, Fig & Balsamic Jam, and Pumpkin Oatmeal

Caramel Apple Crumble Pie

Yields 8-10 servings

Apple Pie Filling
Single Pie Crust Recipe, chilled
3 lbs (1.4 kg) apples, peeled, cored, & sliced
1 tablespoon lemon juice
1/2 cup (100 grams) brown sugar, packed
2 tablespoons all-purpose flour
2 teaspoons ground cinnamon
1/4 teaspoon ground nutmeg
1/8 teaspoon ground cloves
1/4 teaspoon salt
1 tablespoon boiled cider (optional)

Crumble Topping
1/4 cup (57 grams) butter, room temperature
1/3 cup (66 grams) brown sugar
2/3 cup (60 grams) old fashioned oats
1/3 cup (40 grams) all-purpose flour
1/2 teaspoon ground cinnamon
1/8 teaspoon ground nutmeg
1/4 teaspoon salt
Milk, for brushing
1/2 cup (280 grams) caramel sauce*

Preheat oven to 375 degrees F (190 degrees C).

For the apple filling, in a medium bowl, coat the apple slices with lemon juice to prevent browning. Add the brown sugar, flour, spices, salt and boiled cider and toss over the apples until they are evenly coated. Set aside.

For the crumble topping, beat together the butter and brown sugar until light. Stir in the oats, flour, spices, and salt until uniform. Set aside.

On a lightly floured surface, roll out the pie dough round into a 12-inch circle. Place the round into a 9-inch pie plate (or tart pan), folding the edges under and pressing into a decorative pattern. Place the prepared apples into the pie round, mounding them in the center. Break off small pieces of the crumble topping and sprinkle uniformly over the top.

Brush the exposed edges of the pie dough with milk to help them brown. Bake for 55-60 minutes, or until the crumble and crust are golden brown. If the edges begin to darken too quickly, cover with aluminum foil to prevent additional browning.

Cool the pie for at least 3 hours before slicing to allow the juices to set. Drizzle each slice with 1-2 tablespoons of warm caramel sauce before serving.

*To create a vegan version of the pie, use a dairy-free margarine for the butter in the crust and crumble (I prefer Earth Balance Vegan Butter), almond or soy milk for brushing, and a recipe for vegan caramel sauce.