Maple Banana Bread

IMG_9993-2.jpg

A new year, a clean slate. As I welcomed in the new year, I spent time reflecting on the last year, on where I've been and where I'd like to go. In these moments, I have a tendency to focus on my weaknesses, to identify ways I feel I've come up short to my good intentions. Despite my efforts, my lifestyle leans towards the sedentary, the house is in a constant state of needing to be picked up, and my ever-present sweet tooth continues its habit of getting me into trouble. 

This year, instead of fixating on the negative, I intend to look towards the positive, to recognize all the ways I have grown (and can continue to grow). I have no list of resolutions for the new year. Instead, I am working on cultivating a series of intentions—to find the good in stressful situations, to maintain positivity when working with other people, and to push myself to become more skilled at things that I love (like teaching, baking, and woodworking). 

Luckily, practice makes perfect. I anticipate my oven will get plenty of work as I develop and play around with new recipes.

maplebanana1.jpg
IMG_9964-2.jpg

In the past, I have been guilty of loading my banana breads with so many extras that the banana flavor can be lost or overpowered. Certainly these versions have their moments—this loaf with a chocolate hazelnut swirl makes for a lovely dessert and this chocolate cacao nib loaf is best for a morning snack—but sometimes it is worth it to tend towards the traditional. 

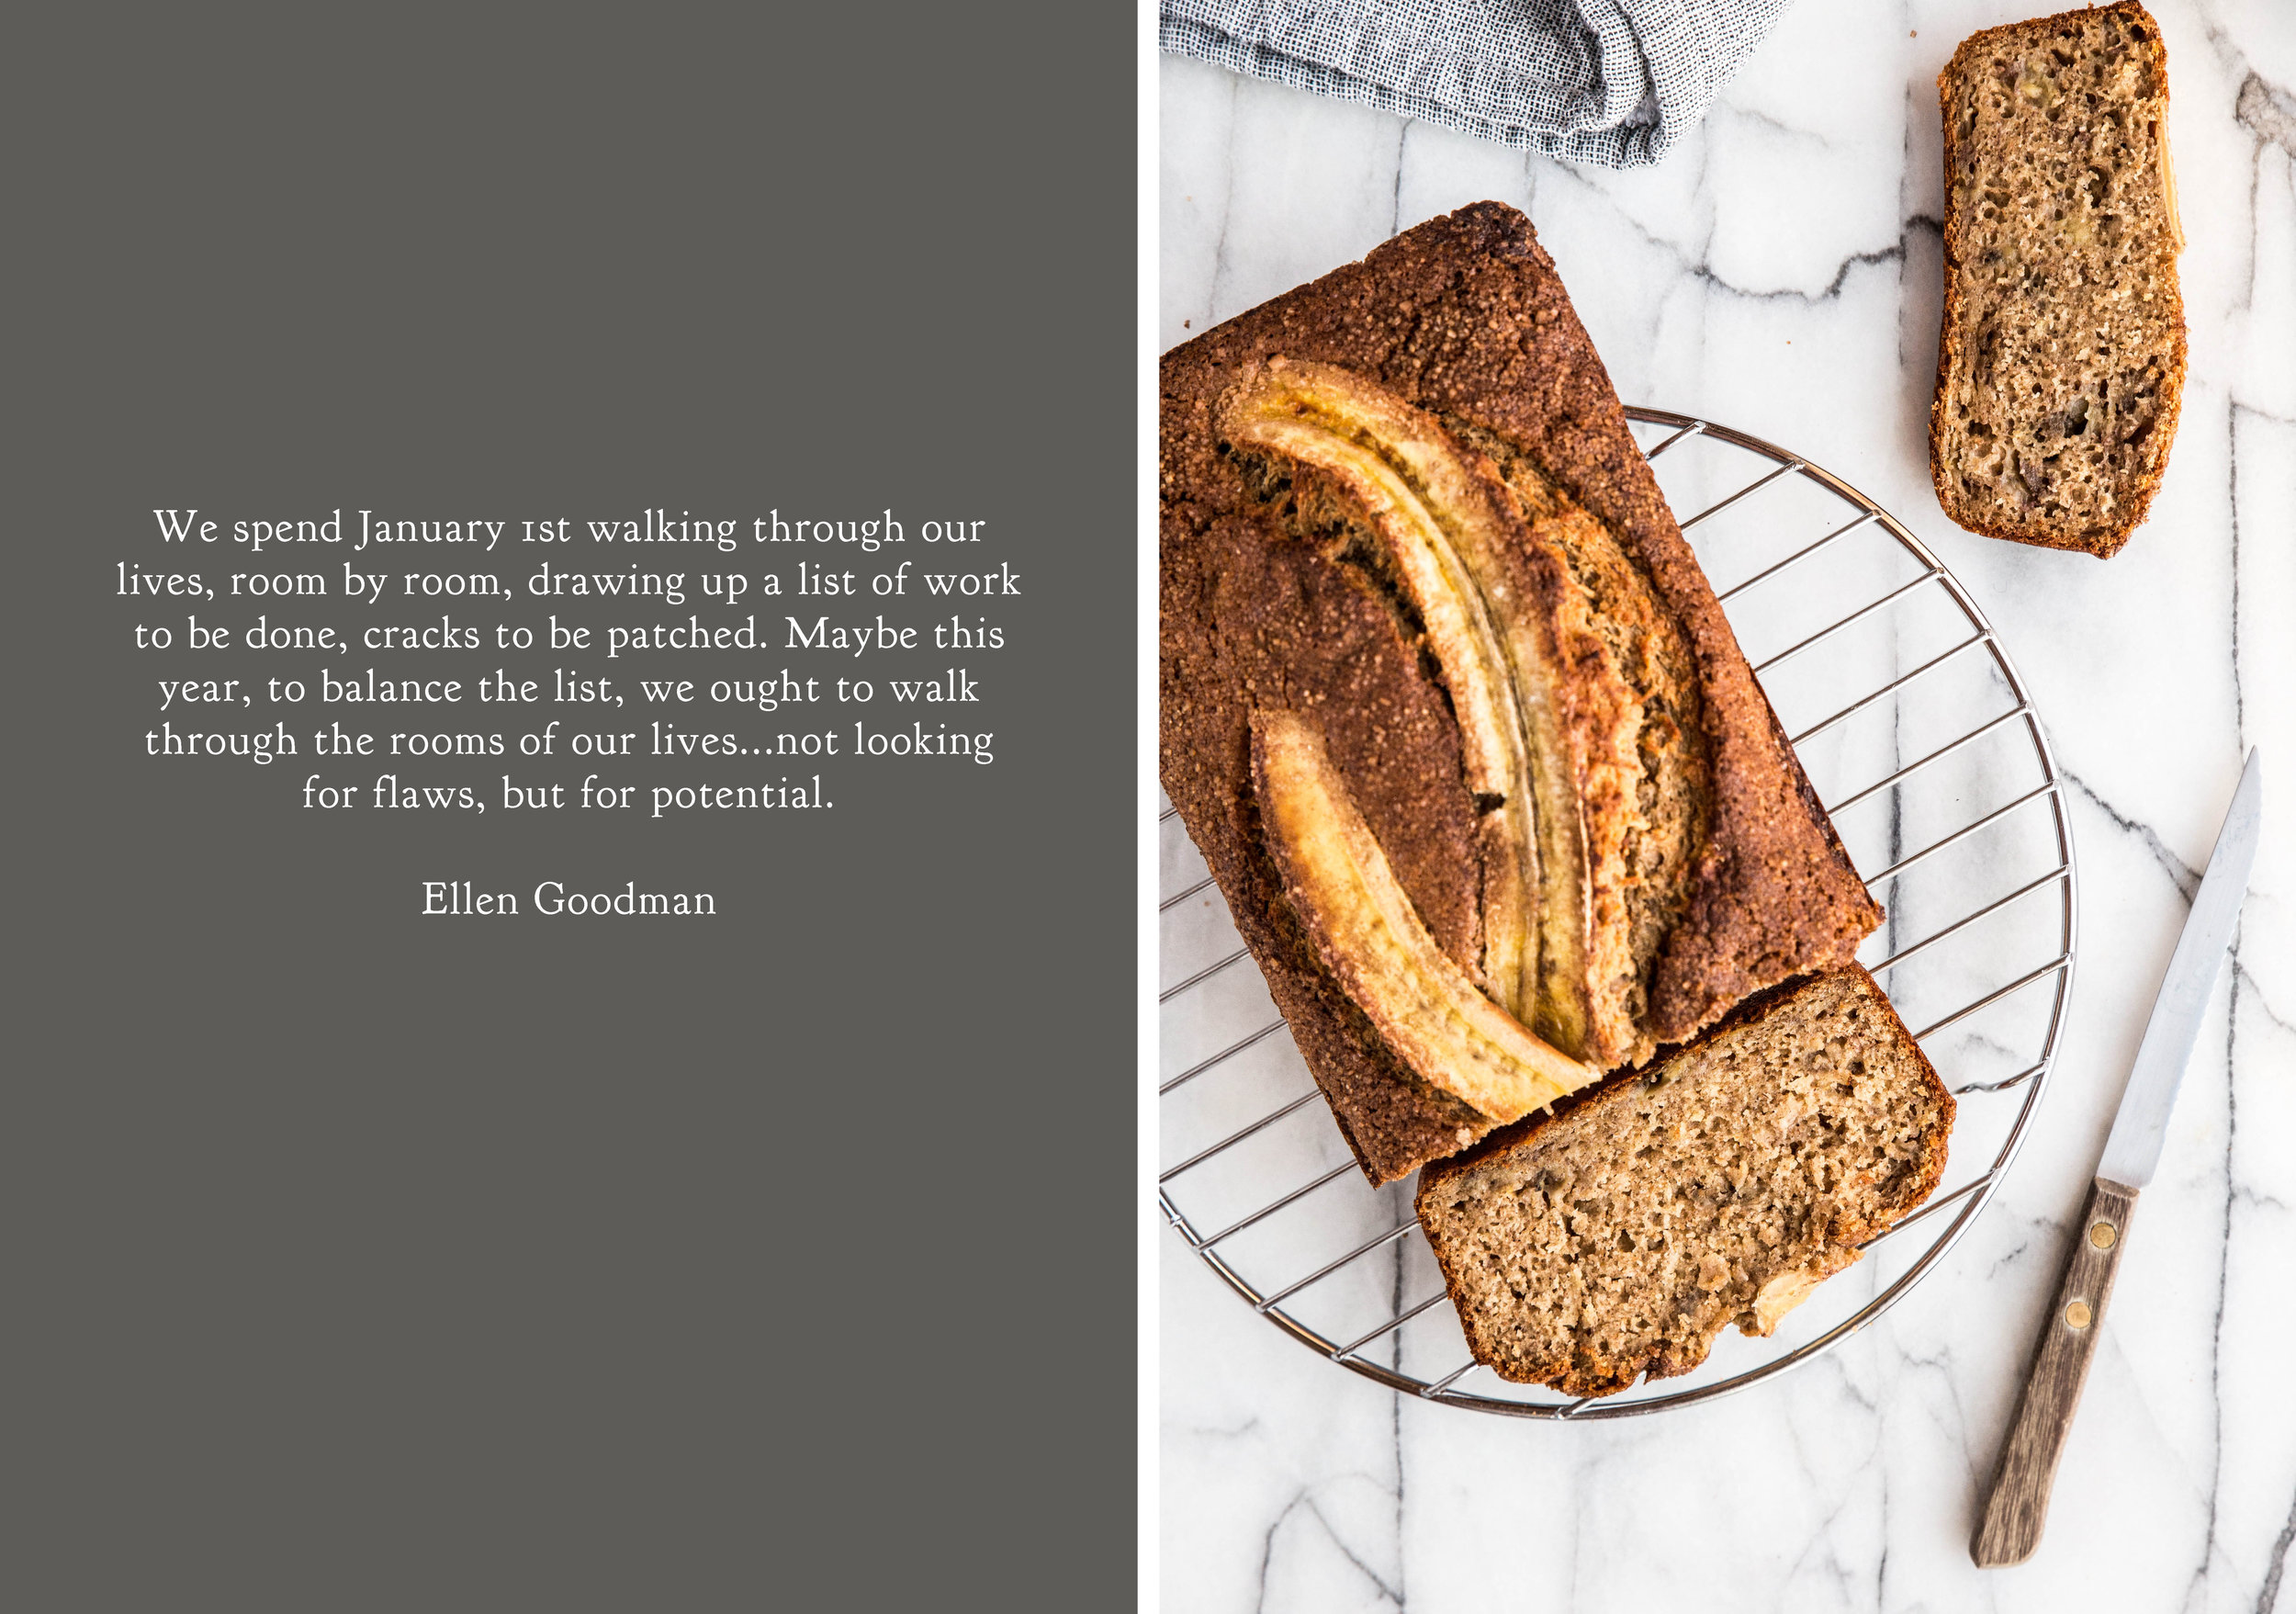
This recipe for Maple Banana Bread is a lighter version of the classic loaf, allowing the flavor and natural sweetness of the banana to shine. With the addition of maple syrup, the sweetness hits a subtle, but pure note. Whole wheat flour is added to bring in whole grains and the loaf is spiced with cinnamon and nutmeg to round out the flavor. As with all of my quick breads, I like to sprinkle a little raw sugar over the top for extra sweetness, giving the loaf something unique.

IMG_0027-2.jpg
IMG_9953-2.jpg

Maple Banana Bread is a lighter take on the traditional loaf of banana bread. Sweetened with maple syrup and gently spiced, this recipe allows the flavor of the banana to shine. A topping of cinnamon and raw sugar give the loaf additional sweetness and texture. Serve alongside a mug of coffee or tea with breakfast or an afternoon snack. 

One Year Ago: Roasted Banana Muffins
Two Years Ago: Coconut Matcha Pudding,  
Three Years Ago: Coconut Almond Quinoa 
Four Years Ago: Almond Date Banana Smoothie 
Five Years Ago:  Chocolate (Dairy-Free) Ice CreamPeanut Butter Banana Oatmeal, & Raspberry White Chocolate Scones
Six Years Ago: Peppermint Hot ChocolateGreen Tea Coconut Ice Cream, & Chocolate Lavender Cupcakes
Seven Years Ago: Banana Cinnamon MuffinsVanilla Pear MilkCranberry Chocolate Muffins, & Salted Caramels

Maple Banana Bread

Yields 5 x 9-inch loaf

Banana Bread
4 large ripe bananas, mashed (about 2 cups or 450 grams)
1/2 cup (156 grams) pure maple syrup
1/2 cup (100 grams) vegetable oil
2 large eggs
2 teaspoons vanilla extract
1 teaspoon ground cinnamon
1/2 teaspoon ground nutmeg
1 teaspoon baking powder
1/2 teaspoons baking soda
1/2 teaspoon salt
1 cup (120 grams) all-purpose flour
1 cup (120 grams) whole wheat flour

Topping
1 tablespoon raw or demerara sugar
1/4 teaspoon ground cinnamon
Thinly sliced banana, for garnish (optional)

Preheat oven to 350 degrees F (180 degrees C). Grease a 5 x 9-inch loaf pan. Set aside.

In a large mixing bowl, whisk together mashed banana, maple syrup, vegetable oil, eggs, and vanilla extract until uniform. Whisk in the cinnamon, nutmeg, baking powder, baking soda, and salt. Gradually stir in the flours. Set aside.

For the topping, stir together the raw sugar and ground cinnamon. Set aside.

Pour batter into prepared pan and smooth until level. Sprinkle topping evenly over the top. If desired, place two pieces of thinly sliced banana on top for garnish. Bake for 55-65 minutes, or until a toothpick inserted in the center comes out clean. Cool in pan for 10 minutes before removing and placing on a cooling rack to cool completely. 

Raspberry Swirl Rolls

My family's holiday traditions have evolved throughout the years. While some traditions stay true, others have gone through revisions. Locations have changed and the guest list adapts as we welcome new faces and say goodbye to those we have loved the longest. While some changes may be bittersweet, we know the importance of gathering together to share and show our love, whether catching up over good food and conversation or stopping on each other's doorsteps for a brief hello.  

For the last few years, my family has spent Christmas close to home. On Christmas Eve, we open presents near the fireplace, as A Christmas Story plays quietly in the background. In the spirit of new holiday traditions, I wake up early on Christmas Day to bake something warm from the oven to create a new set of sweet memories. Since I fly home across state lines near Christmas Eve, I look for recipes to bake that are simple and easy to accomplish—there is no time to spend hours in the kitchen. 

This year I have partnered with Dole Sunshine to #SharetheSunshine by bringing you a holiday recipe that meets these criteria. These Raspberry Swirl Rolls give a fruity twist to the classic cinnamon roll. While a yeast dough may not appear simple at first glance, it is during a closer look. Since the dough spends the majority of time rising and baking without needing attention, there is only a half hour of active time in the preparation. Even better, the recipe can be prepped the evening before and tossed into the oven the next morning for a warm breakfast without creating a messy kitchen.

In the winter, frozen fruit can provide a superior quality in both flavor and consistency when compared to fresh fruits that are out of season or shipped in from another country. Frozen raspberries are the key to making these rolls with less mess and a more vibrant flavor. The frozen raspberries keep their shape when mixed into the filling and when rolled into the dough and sliced, which keeps the counter tops clean.

In the oven, the raspberries transform into a bubbly, gooey filling, which is brightened by the addition of orange zest. A white chocolate spread on the rolls hot from the oven makes these worthy of a second helping. 

IMG_9730-2.jpg

To begin your weekend or holiday morning with warm rolls, the rolls can be assembled the night before and baked the next morning. The evening before, prepare the dough and place the sliced dough in the 9 x 13-inch pan. Wrap the pan tightly in plastic wrap and place in the refrigerator overnight. In the morning, preheat the oven and set out the dough to warm and rise until doubled, about 30-45 minutes, and bake the rolls as indicated. 

Alternatively, the rolls can be baked the evening before, covered with aluminum foil, and reheated in a 350 degree F oven until heated through. 

May your holiday mornings be filled with flavor, family, & cheer. Happy Holidays, dear friends.

IMG_9827-2.jpg

Raspberry Swirl Rolls with White Chocolate Glaze make for a dreamy addition to your holiday brunch menu. The tartness of the raspberries is complemented by the sweetness of the white chocolate glaze and the hint of orange zest in the filling. The rolls have a soft, but chewy texture enhanced by the gooey fruit filling. Serve warm from the oven and share with dear family and friends.

One Year Ago: Chocolate Cream Pie
Three Years Ago: Chocolate Sugar Cookies
Four Years Ago:  Sugar Cookies 
Five Years Ago: Candy Cane Cupcakes & Chocolate (Dairy-Free!) Ice Cream
Six Years Ago: Chocolate Clementine Cupcakes & Peppermint Hot Chocolate
Seven Years Ago: Gingerbread Cheesecake & Peppermint Ice Cream

Raspberry Swirl Rolls with White Chocolate Glaze

Yields 12 rolls

Dough
1 cup (240 mL) lukewarm milk (about 100 degrees F/38 degrees C)
1/4 cup (56 grams) butter, melted
2 1/2 teaspoons active dry yeast
1 large egg
1/4 cup (50 grams) granulated sugar
1 teaspoon salt
3 1/2 cups (420 grams) all-purpose flour

Raspberry Filling
Zest of 1 orange
1/4 cup (50 grams) granulated sugar
1 teaspoon cornstarch
10 ounces (283 grams) Dole Frozen Raspberries

White Chocolate Glaze
4 ounces (130 grams) white chocolate, melted
2 tablespoons heavy cream
1 teaspoon vanilla extract

For the dough, place lukewarm milk, melted butter, yeast, egg, sugar, and salt into a large mixing bowl.  Whisk until combined. Add flour and stir until the mixture begins to form a dough. On a lightly floured surface, place the dough and knead by hand until smooth and elastic, about 5-8 minutes. Alternatively, place the dough into a stand mixer with a dough hook attachment and knead on low for 5-8 minutes, or until smooth and elastic.

Form into a ball and place into a lightly greased bowl. Cover and allow the dough to rise in a warm environment until doubled in volume, about 1 hour.

On a lightly floured surface, roll out the dough into a 12 x 15-inch rectangle.

For the filling, mix together the sugar and orange zest until fragrant. Mix in the cornstarch. Gently stir in the frozen raspberries. Working quickly to prevent the raspberries from thawing, sprinkle raspberry mixture uniformly on the dough, leaving a 1-inch border around the edges. Starting lengthwise, roll the dough into a log shape. Trim off the ends and slice the roll into 12 evenly sized pieces. Place rolls into a parchment-lined 9 x 13-inch pan. Cover and let rise until doubled, about 30-45 minutes.

Preheat oven to 375 degrees F (190 degrees C). 

Bake rolls for 20-25 minutes, or until lightly browned (internal temperature of 190 degrees F/87 degrees C). 

While the rolls are baking, stir together the melted white chocolate, heavy cream, and vanilla extract in a small bowl until smooth. Spread baked rolls with glaze using an off-set spatula while still hot. Serve warm.


This post is sponsored through a partnership with Dole Sunshine. As always, all thoughts and opinions are my own. I am incredibly excited to be working with Dole Sunshine because of the excellent quality of their frozen & preserved fruits. Thank you for supporting Pastry Affair & my wonderful sponsors!

Honey Cookies

honeycookies6.jpg

This honey cookie recipe has been passed down through four generations in my family. Shared between mother and daughter, grandmother and granddaughter, and cousin to cousin, this recipe is weaved throughout our family history. The honey cookies are guests at our holiday celebrations, making their appearance when family is gathered.

Growing up, the honey cookies were served out of large vintage yellow Tupperware container, brought in from the cold garage after the evening meal. By this time, the dessert table was already full, arranged with candies and cookies of all flavors and textures on brightly colored holiday plates. Since the honey cookies were a late arrival to the party (we would have certainly spoiled our appetites if they arrived sooner), they were placed on a nearby dining room chair. It didn't matter that the cookies were cold, or that they were not presented just so—everyone knew they were the genuine star of the holiday table.

Memories of holidays past bring up images of family laughing around the table, cousins sneaking extra cookies in pockets and up sleeves, and my grandfather reminding everyone, again, how much he loved these cookies.

honeycookies2.jpg

These honey cookies are a modest spiced cookie, no flashy sprinkles or bright colors, but it is their simplicity that makes them beautiful. The recipe for these honey cookies is traditionally of German heritage, prepared over the stove instead of in a mixer. The sugars are brought to a boil before the mixture is combined with butter, eggs, and sour cream. Once the flour is stirred in, the soft dough is chilled in the refrigerator to stiffen. The baked cookies have a unique texture—soft, yet substantial.

These honey cookies hold so much nostalgia for me. The smell brings out the savory and sweet scents of Christmas Eve dinner. The sight carries images of my late grandfather telling everyone another story, cookie in hand. The taste—well, the taste is of home.

May these cookies bring you and yours as many memories as they have given me.

IMG_9453-2.jpg

These soft Honey Cookies embrace the comforting flavors of the holiday—cinnamon, nutmeg, cloves, and anise. The spices come together beautifully and the addition of sour cream make these cookies soft to the touch and to the taste. An anise glaze may be added for a touch more flavor and a hint more sweetness. The cookies bake up smooth, which is perfect for decorating if you choose to do so. Share these cookies with family and friends during your holiday celebrations—perhaps you'll start a new tradition. 

One Year Ago: Chocolate Cream Pie
Three Years Ago: Chocolate Sugar Cookies
Four Years Ago:  Sugar Cookies 
Five Years Ago: Red Wine Chocolate Truffles & Gingerbread Cookies
Six Years Ago: Candy Cane Popcorn
Seven Years Ago: Chocolate Truffles

Honey Cookies

Yields approximately 4 dozen cookies

1 cup (340 grams) honey
1 cup (200 grams) brown sugar, packed
3/4 teaspoon ground cinnamon
3/4 teaspoon ground nutmeg
3/4 teaspoon ground cloves
1/2 teaspoon anise extract*
1/4 cup (57 grams) butter
1/4 cup (60 mL) strong black coffee
2 large eggs, whisked
1/2 cup (113 grams) sour cream
1 teaspoon baking soda
1 teaspoon baking powder
5 cups (600 grams) all-purpose flour

In a large saucepan, bring the honey, brown sugar, cinnamon, nutmeg, ground cloves, and anise extract to a boil over medium-high heat. Once boiling, turn off the heat and add the butter and coffee. Allow mixture to cool to room temperature before adding the eggs, sour cream, baking soda, and baking powder. Stir well. Gradually mix in the flour to form a soft dough. Refrigerate for 6 hours or overnight, until the dough stiffens considerably.

Preheat oven to 350 degrees F. Line a baking sheet with parchment paper.

On a heavily floured surface, roll out dough to 1/4-inch thickness. Cut out 2-inch round cookies (or other shapes), re-rolling dough as needed. If you don't have a round cookie cutter, a water glass will also do the trick. Bake for 12 minutes, or until cookies are lightly browned and puffed. Cool completely before glazing.

Anise Glaze** 
1 cup (227 grams) powdered sugar
1/8 teaspoon anise extract
2 teaspoons heavy cream, plus extra if needed

In a small bowl, mix together powdered sugar, anise extract, and heavy cream. If glaze is too thick, add more cream 1 teaspoon at a time until glaze is spreadable. Spread glaze onto cookies with an offset spatula and allow cookies to rest until glaze to set before serving or storing.

* 3/4 teaspoon anise seed can be substituted for the anise extract.

**In the photographs shown above, I decorated the cookies with a royal icing flavored with anise extract, but honey cookies are traditionally spread with or dipped into the anise glaze.